
-
Click Administration, then select the Users tab.
-
Select your user account.
-
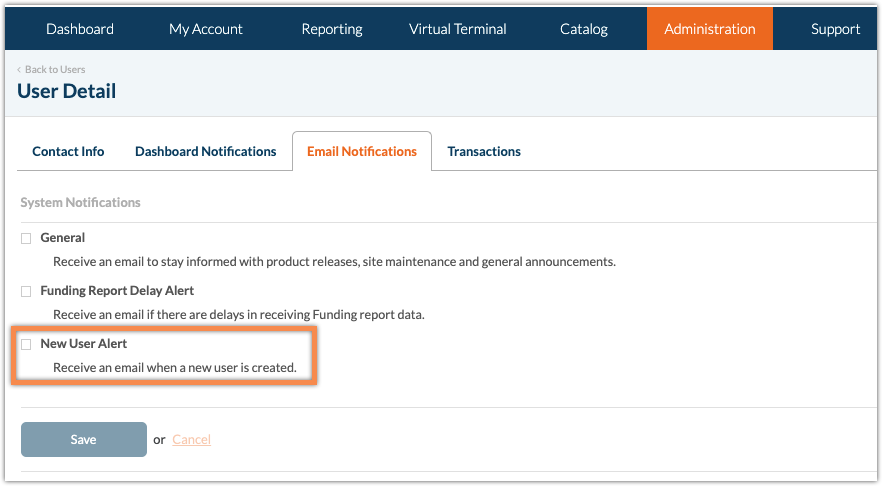
On the User Detail page, click the Email Notifications tab, select the New User Alert checkbox, then click Save.

Overview
Release notes are intended to improve your experience of the CardPointe Desktop web application by keeping you informed of the latest features and enhancements.
CardPointe Release 1.77 (10/14/2025)
This release includes the following updates:
Virtual Terminal - Level 3 Data Fields
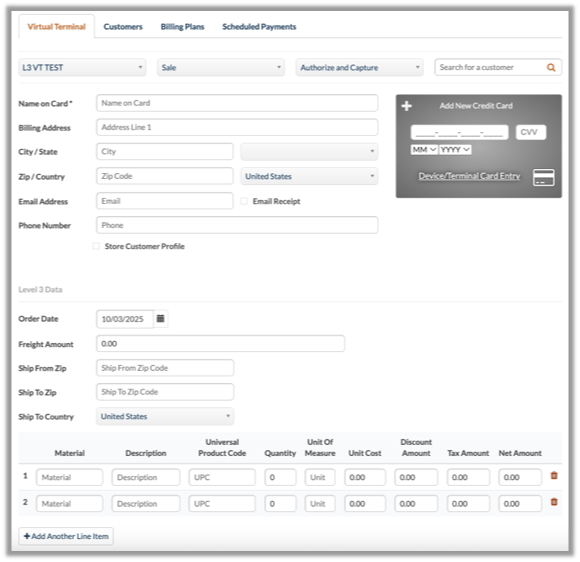
To help merchants comply with the updated Visa Commercial Enhanced Data Program (CEDP), the CardPointe VT now includes additional Level 3 transaction detail fields to allow you to specify additional order and line item details for applicable commercial and government purchase card transactions.
The Level 3 Data setting includes the following fields:
Order Details
- Order Date - The date that the order was created.
- Freight Amount - The freight cost for the order, if applicable.
- Ship from Zip - The zip code that the order ships from, if applicable.
- Ship to Zip - The zip code that the order ships to, if applicable.
- Ship to Country - The country that the order ships to, if applicable
Line Item Details
- Material - An optional material code for the item.
- Description - A description of the item.
- Universal Product Code - The Universal Product Code (UPC) or commodity code of the item.
- Quantity - The quantity of the item in this order.
- Unit of Measure - The unit of measure for the item (for example, "each" or "ton").
- Unit cost - The per-unit cost of the item.
- Discount Amount - The discount amount (in dollars and cents) for the item, if applicable.
- Tax Amount - The tax amount for the item (in dollars and cents) if applicable.
- Net Amount - The net cost for the item, where Unit Cost - Discount Amount + Tax Amount = Net Amount.
Note: To include the Level 3 Data fields on the Virtual Terminal and in the Transaction Details for reporting purposes, you must enable the following Virtual Terminal settings from the Administration tab:
- Level3 - VT
- Level3 - Transaction Details
Reporting - Payment Type and Batch Type
To improve reporting for merchants with consolidated credit card and ACH merchant accounts, we have added new Payment Type and Batch Type filters to CardPointe transaction, funding, and batch reporting.
Payment Type
A new Payment Type field and filter has been added to the following reporting components:
- Reporting > Funding > Funding Detail > Transactions includes a new Payment Type filter.
- Reporting > Transactions table and Transaction Detail include a new Payment Type field.
The Payment Type field and filter support the following values to help identify and filter transactions:
- ACH
- Cash
- Credit
- Pin Debit
Batch Type
A new Batch Type field and filter has been added to the following reporting components:
- Reporting > Funding > Funding Detail > Funding Batches includes a new Batch Type filter.
- Reporting > Gateway Batches table and Batch Detail include a new Batch Type field.
The Batch Type field and filter support the following values to help identify and filter batches:
- ACH
- Card
- Unspecified (returned for batches created prior to this release, where no batch type is available)
CardPointe 1.74 (6/9/25)
SMS Two Factor Authentication Option Added
A new Two Factor Authentication section was added to the User Detail tab in CardPointe.
This section contains the current authentication method settings for the selected account. For all existing accounts, this section is currently read-only with Method set to Email verification.
This section can also be found on the User Detail tab when creating a new user in CardPointe.
In future updates, users will be able to change their authentication method to SMS verification and add their phone number.
This change is part of future enhancements related to multi-factor authentication via SMS texts.
CardPointe 1.73 (4/15/25)
Phone Number Contact Information Now Supported
You can now associate a Phone Number with a merchant account, improving account management.
For our existing users, this new Phone Number field will be located under the Email field in the following sections:
The Contact Information section within your My Profile
The Contact Info tab on your User Detail page
When creating a new user, the Phone Number field will also be available under the Contact Information section during the setup process.
Additionally, the authentication timeframe has changed from authenticating every three days to every 24 hours for all users.
CardPointe 1.72 (1/29/25)
This release includes backend enhancements and bug fixes.
CardPointe 1.71 Release (11/19/24)
This release includes backend enhancements and bug fixes.
CardPointe 1.70 Release (10/30/24)
Card Information Now Masked After Entry
After entering a credit card number or CVV, once the user clicks off of the respective textbox the information will be masked. For credit card numbers, only the first 12 numbers will be masked to ensure ease of use and navigation. This security enhancement was implemented throughout the CardPointe Web Application.
Logout Due to Inactivity Time Decreased
Previously, the CardPointe Web Application forced a logout after 45 minutes of inactivity. This time was decreased to 15 minutes.
Tickets Upload File Max Size Decreased
Previously, the maximum file size a user could upload when submitting a ticket was 100 MB. This was decreased to 10 MB. Files larger than this will not be accepted as uploads.
Bug Fixes
CardPointe 101 Tutorials Display Error
An issue with CardPointe's content security policy caused the CardPointe 101 tours to be unavailable for users. This issue was resolved.
FDMP Product ID Entry Error
Previously, an error could occur if a user was entering an FDMP product ID that contained letters. This issue will no longer occur.
CardPointe Release 1.69 (10/2/24)
This release the following updates and bug fixes, in addition to backend enhancements:
ProfitStars ACH Virtual Terminal Decommission
ProfitStars ACH is no longer offered as an option for transactions handled through the CardPointe Virtual Terminal. It is also no longer offered as an option on new Billing Plans or for new Customer Profiles.
Contact your sales partner for information on alternative solutions.
Receipt Print Error Fix
An issue that caused a 500 error to occur when attempting to print receipts for refund transactions was resolved.
Threshold Update Error Fix
An error that caused an updates to the threshold amount field to not be saved was resolved.
Force Credit Surcharge Transactions Display Issue Fix
An error that caused force credit transactions with surcharge applied to not display the correct subtotal amount was resolved.
CardPointe 1.68 Release (6/4/24)
This release contains minor backend enhancements and bug fixes.
CardPointe 1.67 Release (5/6/24)
This release contains the following updates as well as additional backend updates and enhancements:
New Data Migrations Ticket Types
Two new ticket types are now available for requesting merchant data migrations to or from the CardPointe Gateway. These tickets are CardPointe Data Migration - Export and CardPointe Data Migration - Import. These tickets replace the previous request process. Once a ticket is created, the CardPointe Data Migrations team is notified and the data migration process begins.
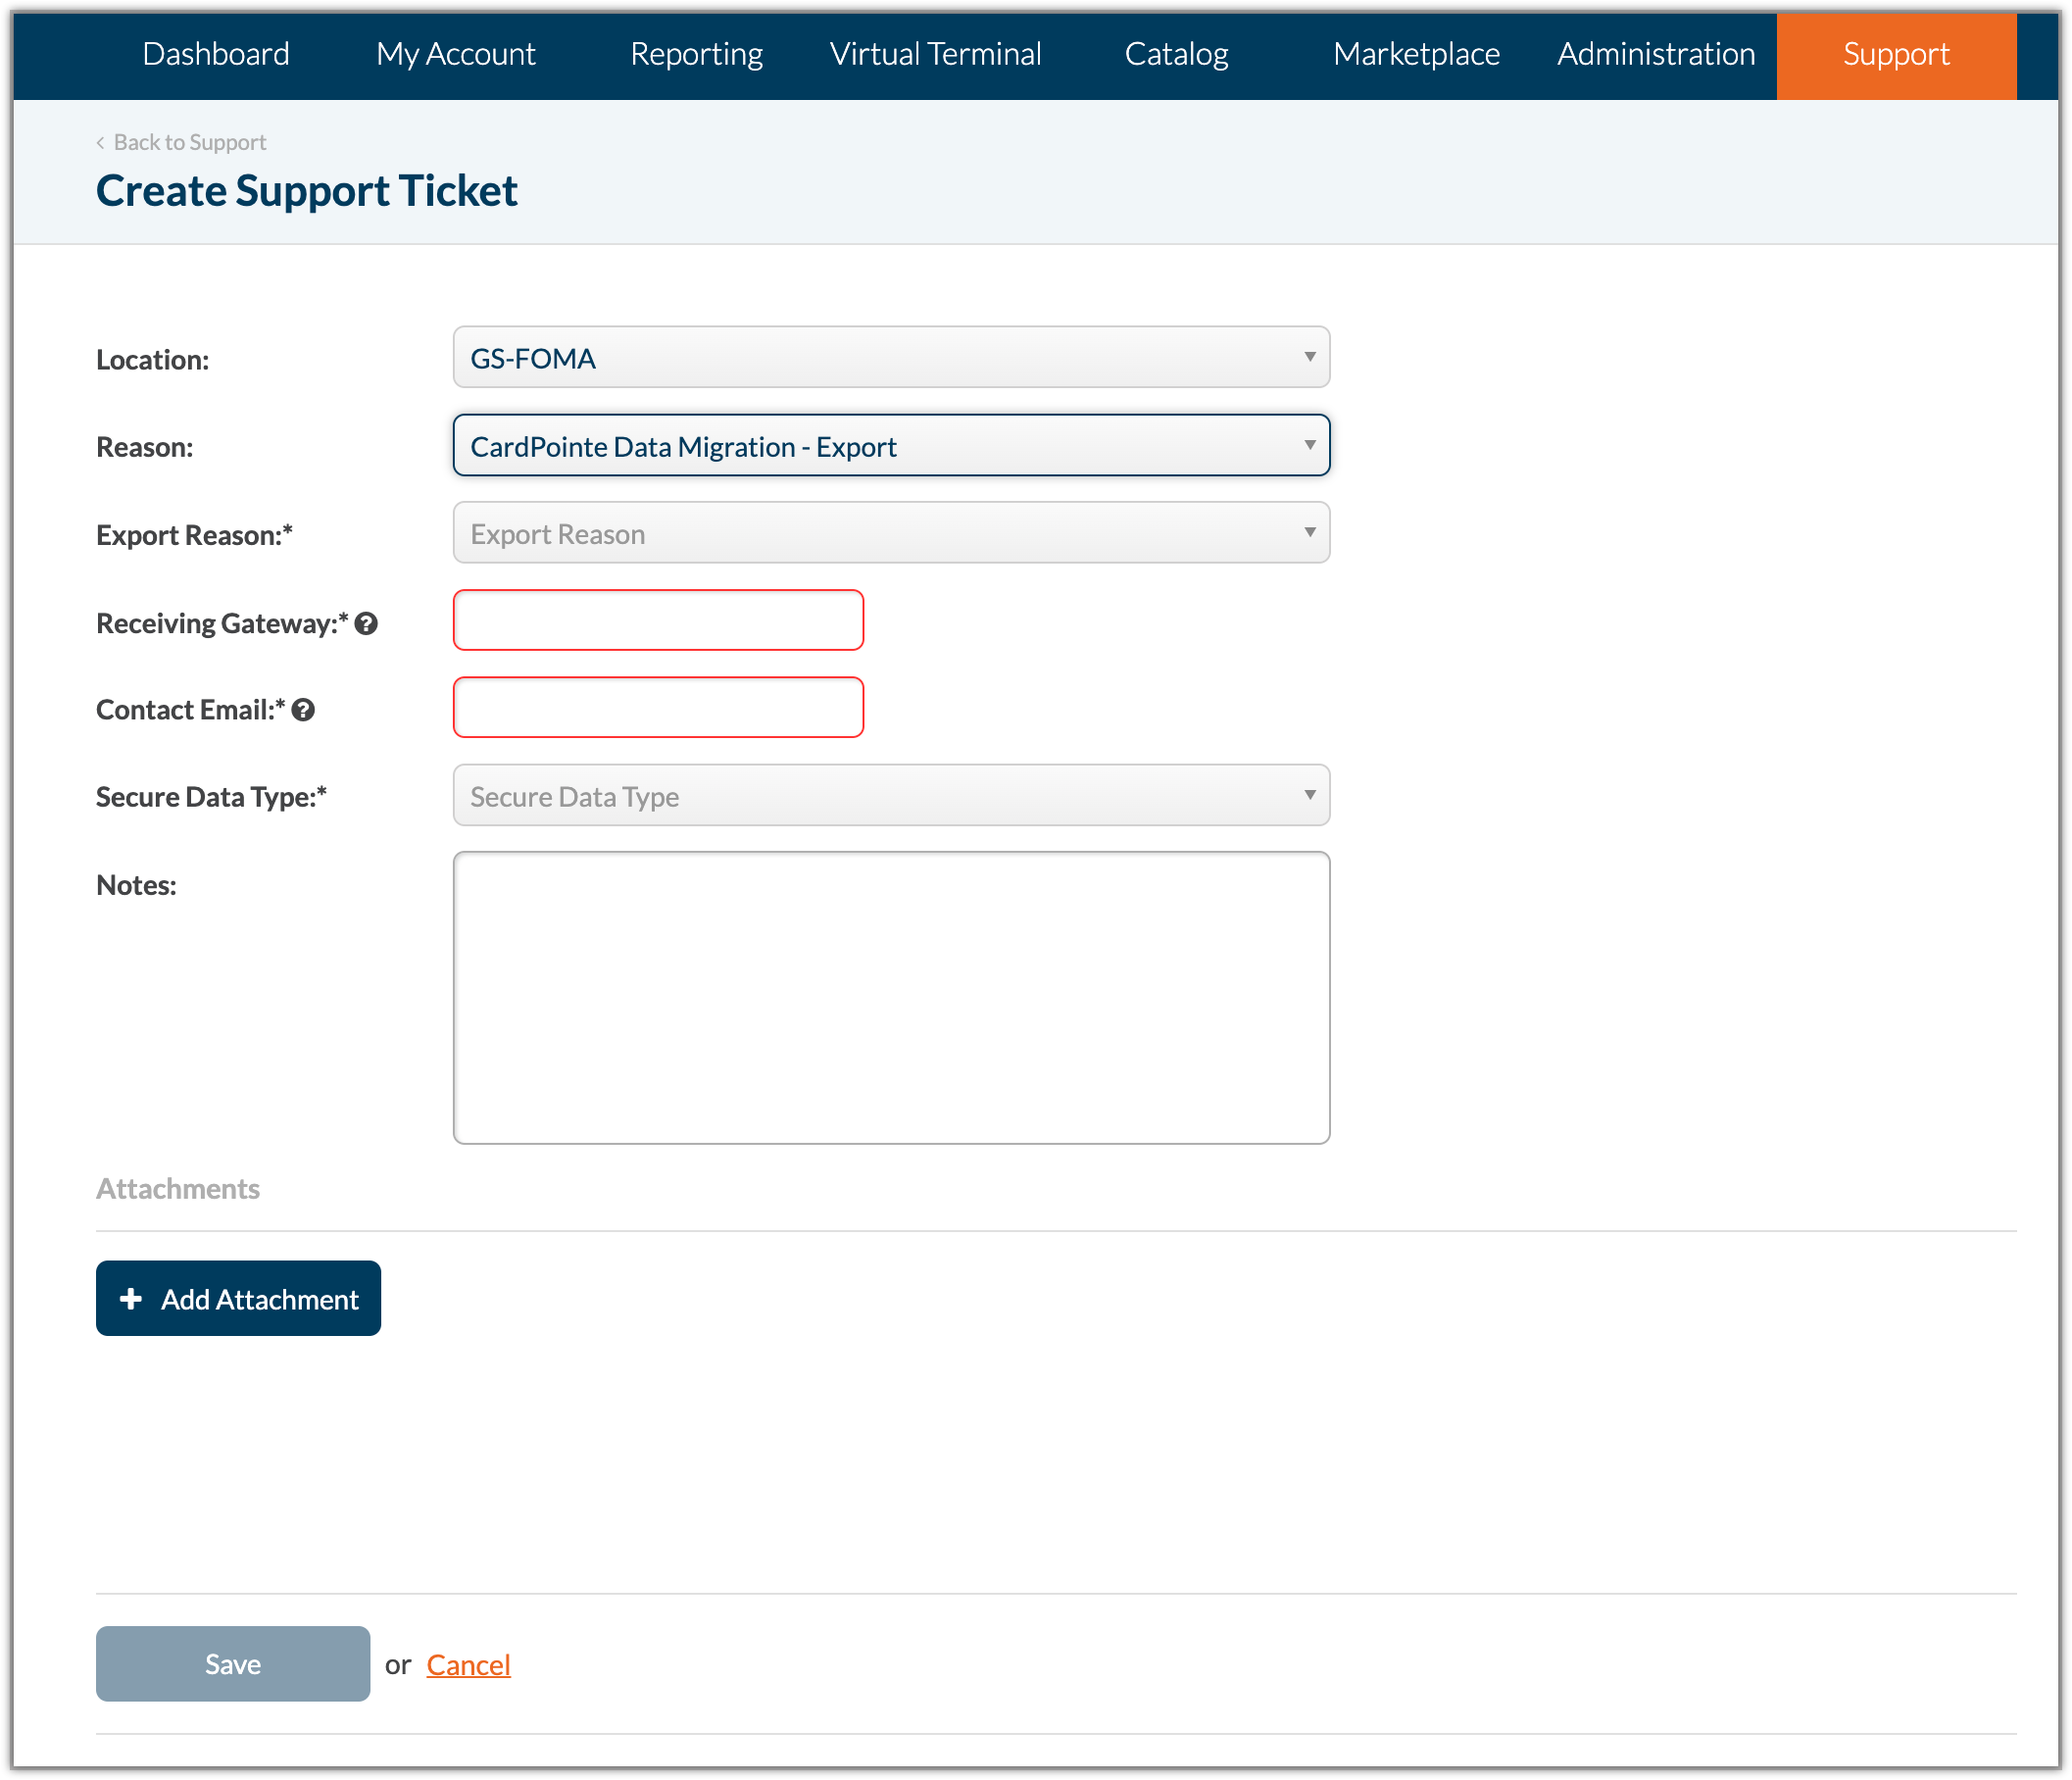
CardPointe Data Migration - Export
The CardPointe Data Migration - Export ticket contains the following fields:
| Field Name | Required | Description |
|---|---|---|
| Export Reason | Yes | The reason for the export request. One of the following options:
|
| Receiving Gateway | Yes | The user's new gateway provider to which the exported data will be sent. |
| Contact Email | Yes | The email address of the user's new gateway provider to which the exported data will be sent. |
| Secure Data Type | Yes | The preferred data type for the exported data. One of the following options:
|
| Notes | No | Optionally, provide any additional information related to the data migration request. |
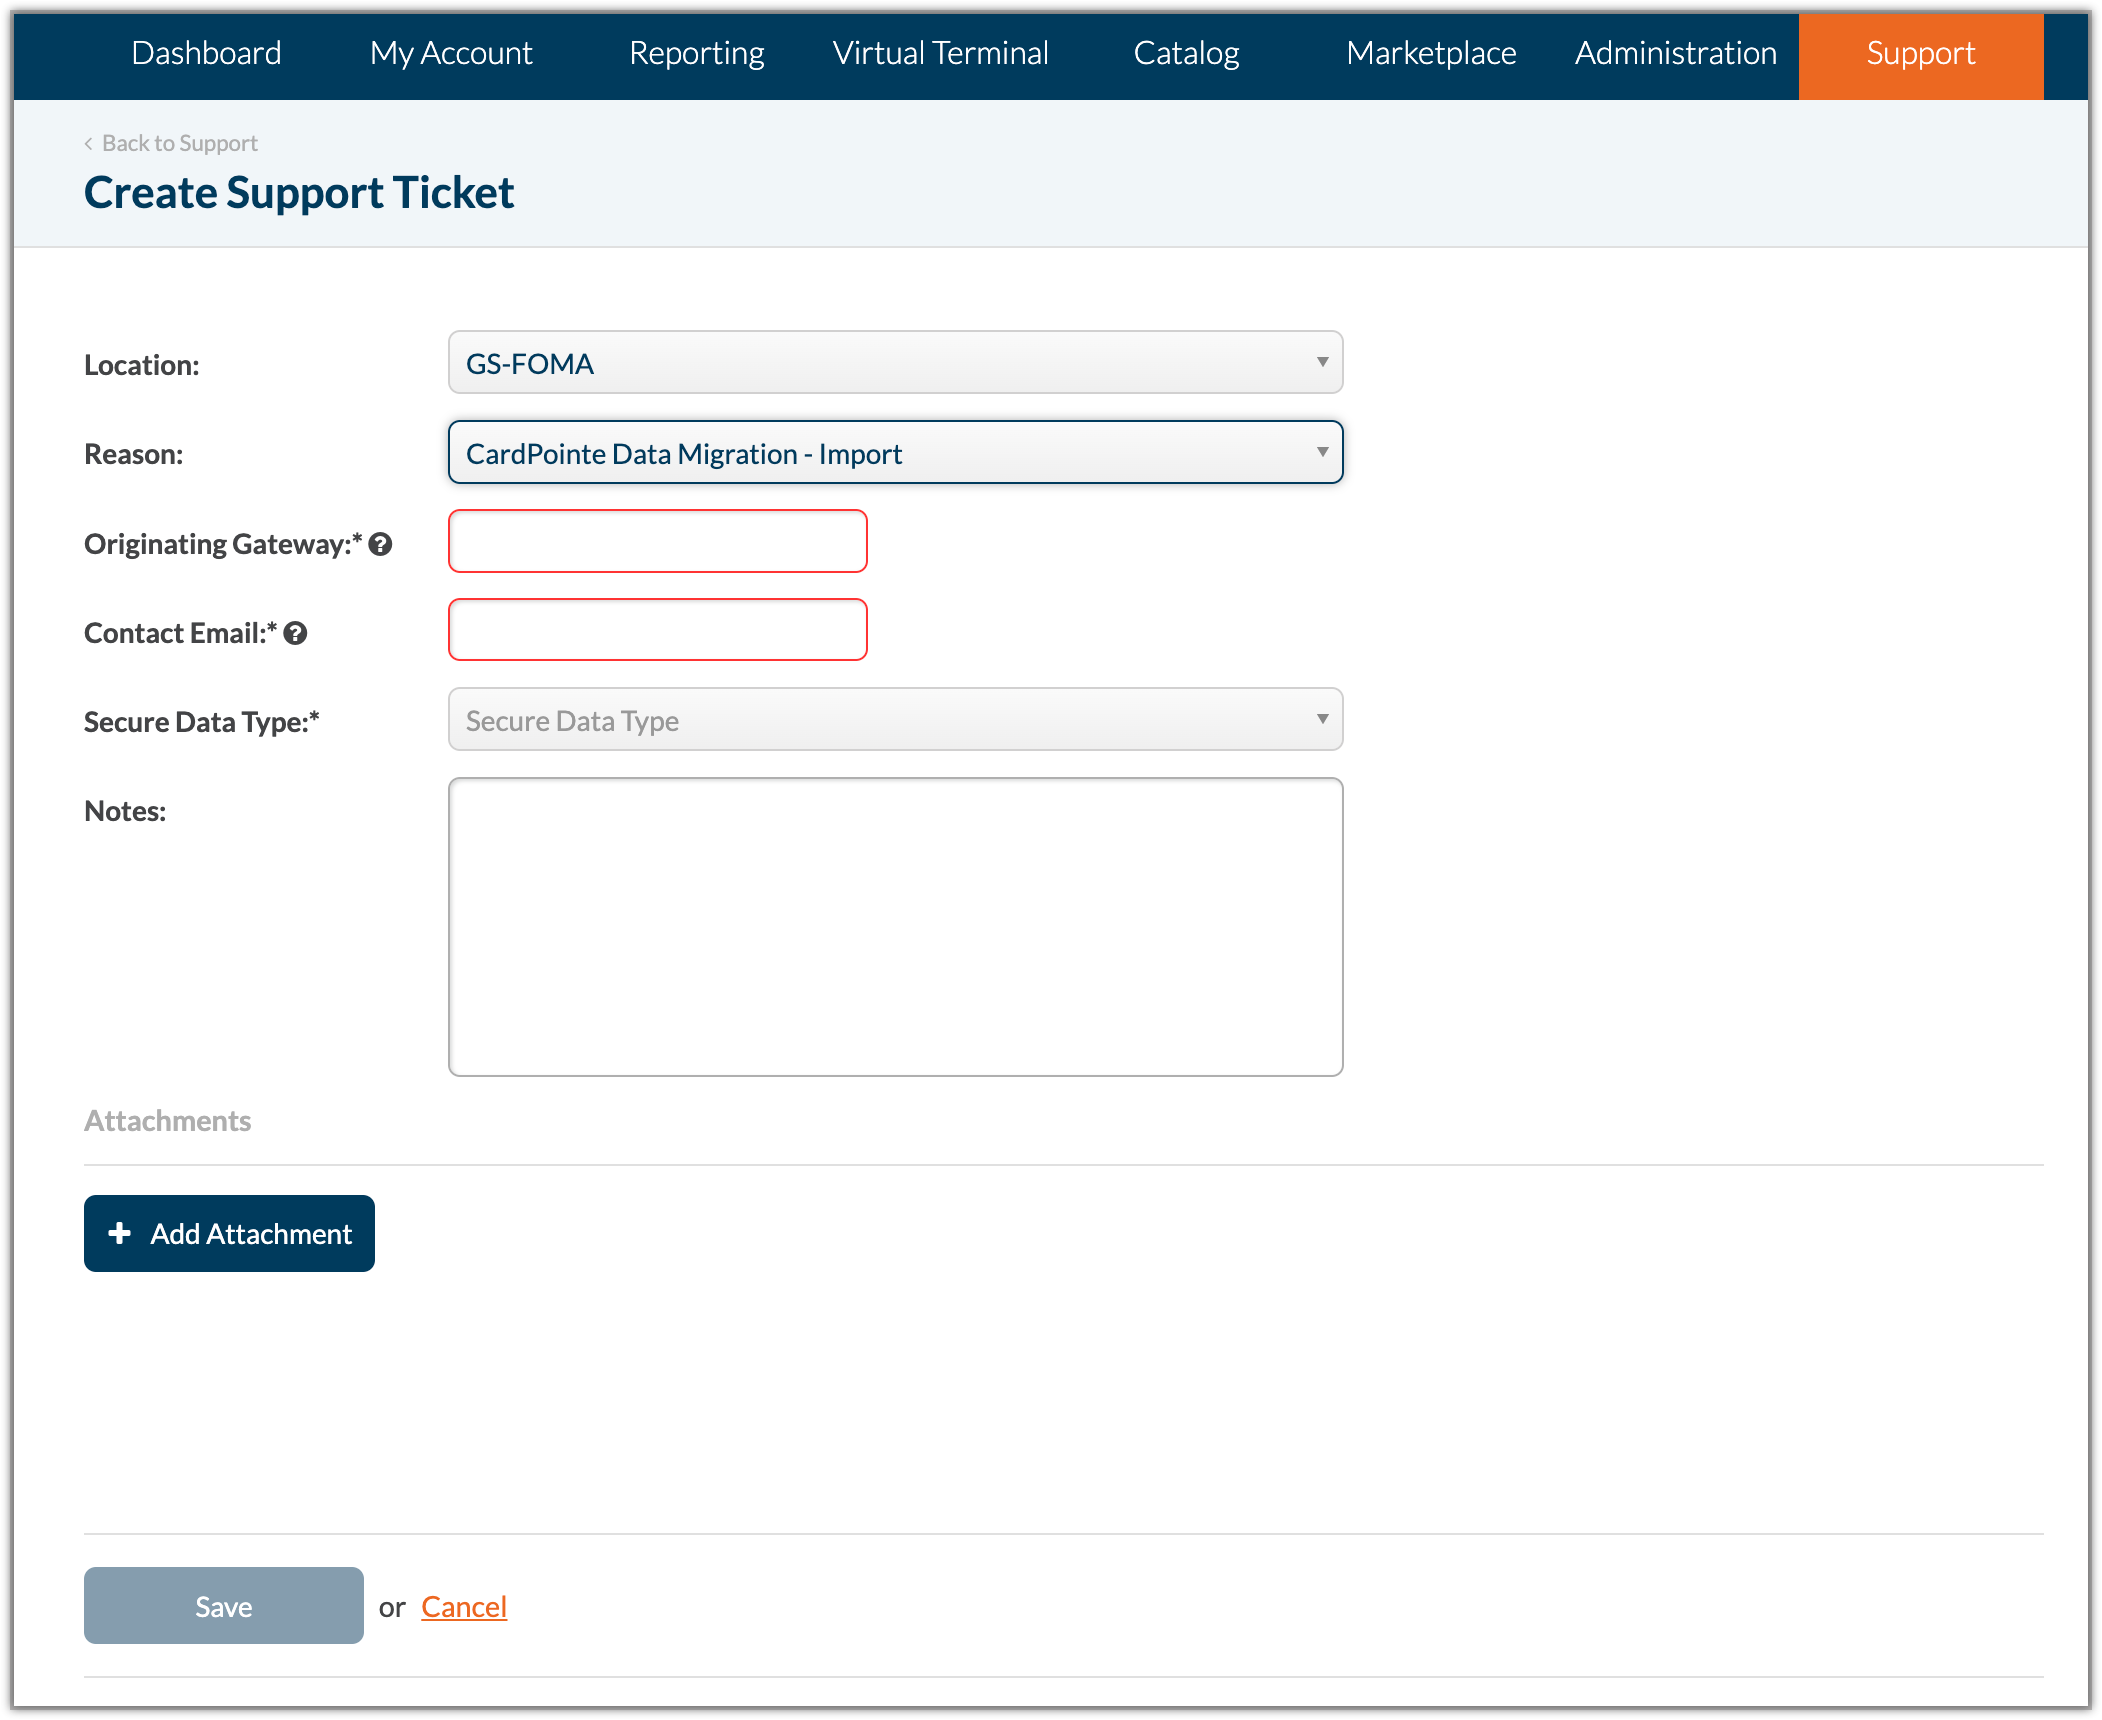
CardPointe Data Migration - Import
The CardPointe Data Migration - Import ticket contains the following fields:
| Field Name | Required | Description |
|---|---|---|
| Originating Gateway | Yes | The current gateway provider from whom the data will be imported. |
| Contact Email | Yes | The email address of the current gateway provider from whom the data will be imported. |
| Secure Data Type | Yes | The preferred data type for the imported data. One of the following options:
|
| Notes | No | Optionally, provide any additional information related to the data migration request. |
Search Maximum Character Limit
All search input fields now have a maximum limit of 1,000 characters.
Credit Card Surcharge Column Display Fix
An error that caused the Credit Card Surcharge column on the Transactions reporting tables to display positive amounts for Refund transactions has been fixed.
CardPointe 1.66 Release (2/6/24)
This release includes the following update, in addition to backend enhancements:
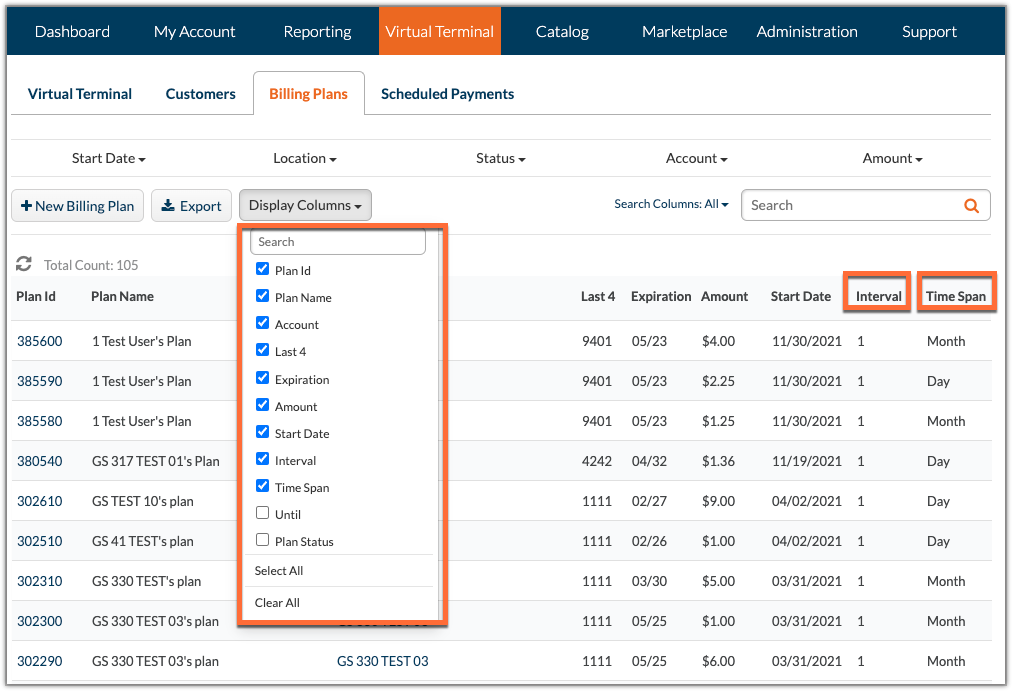
Column Additions and New Column Selector for Billing Plans Table
The Interval and Time Span columns were added to the Billing Plans table.
Additionally, the table now includes a Display Columns menu with the following columns available:
- Plan ID
- Plan Name
- Account
- Last 4
- Expiration
- Amount
- Start Date
- Interval
- Time Span
- Until
- Plan Status
CardPointe 1.65 Release (11/13/2023)
This release the following addition and bug fix in addition to backend enhancements:
- Site User ID Added
- PCI Compliance Link Fix
Site User ID Added
The Site User ID field was added to the My Profile page and the User Detail page under Users in the Administration section
PCI Compliance Link Fix
The PCI Compliance link in the Accounts table under My Account was updated to ensure functionality.
CardPointe 1.64 Release (11/1/23)
The CardPointe 1.64 update released on the evening of 11/1/23.
In addition to the following, this release included backend enhancements and improvements:
- Form 1099-K Tab
- Columns Added to Customer Tab
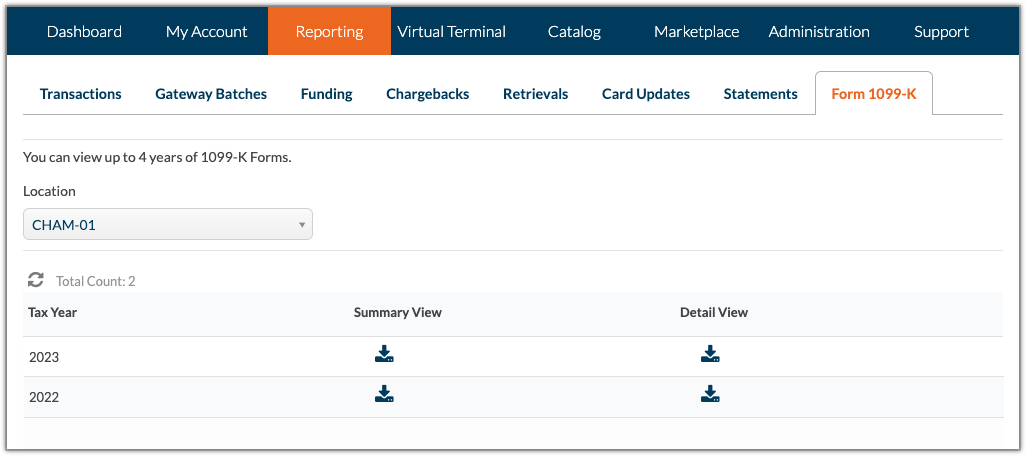
Form 1099-K Tab
The new Form 1099-K page was added to CardPointe to allow users to access their yearly 1099-K forms. This page is located under the Reporting tab to the right of the Statements tab. When viewing this page, you can view up to 4 years of 1099-K forms. The location will automatically be selected based on the information given in the Descriptors settings. You can change the location by using the location dropdown located above the table.
The columns of the table are:
- Tax Year
- Summary View
- Detail View
Clicking on the Summary View or Detail View options for a given 1099-K form option will result in a PDF download of a form. The Summary View option provides the standard 1099-K form giving a one-page summary of the year's transactions. The Detail View option offers the Summary View overview in addition to a list of transactions and totals for each MID.
A new Site Permission was added to control access to this tab. The Form 1099-K permission is enabled by default for Admin users and can be enabled for Standard users. For more information on setting user permissions in CardPointe, refer to the User Detail section of this page.
Columns Added to Customer Tab
The new additional columns on the Customer tab under Virtual Terminal are:
- Token
- ProfileID
- AcctID
- Address 2
- Country
- Date/Time Added
- Last Updated
These columns can be applied via the Display Column Selector. The Company Name and Address 2 fields will only display if the Active checkbox is selected on the page under the Administration - Virtual Terminal tab.
The search capabilities were updated accordingly.
All fields will be present on the exported page.
CardPointe 1.63 Release (5/15/23)
This release includes the following enhancements as well as backend improvements and fixes:
- CardPointe 101 Tutorials
- Export Functionality for My Account Pages
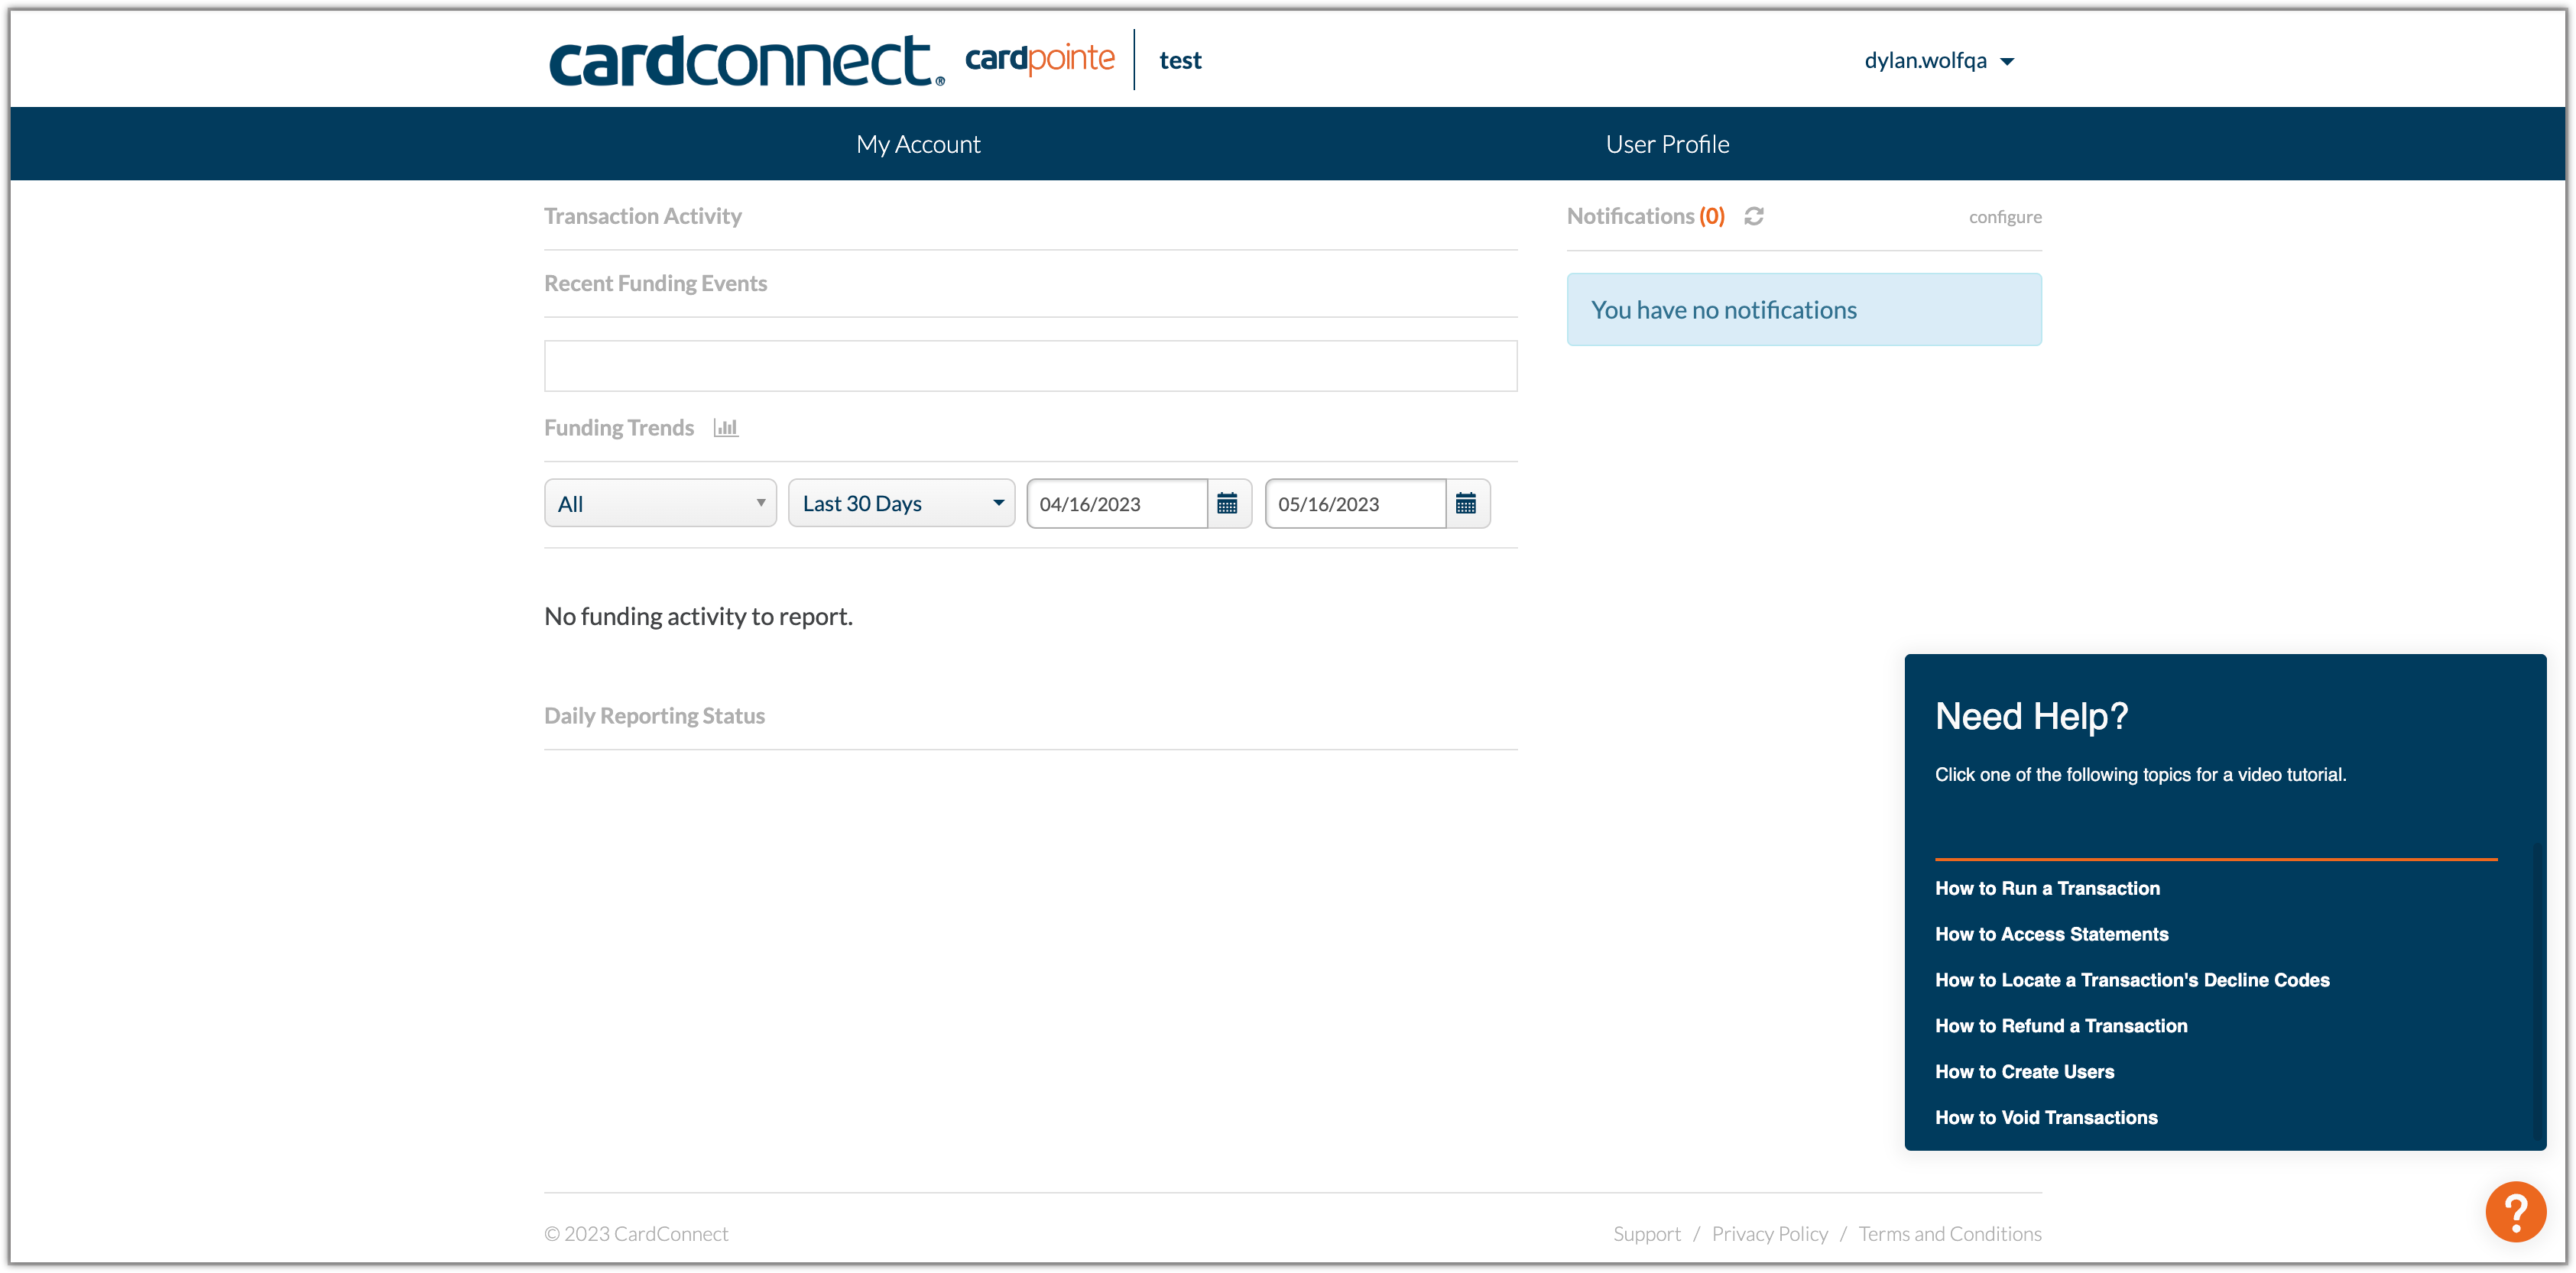
CardPointe 101 Tutorials
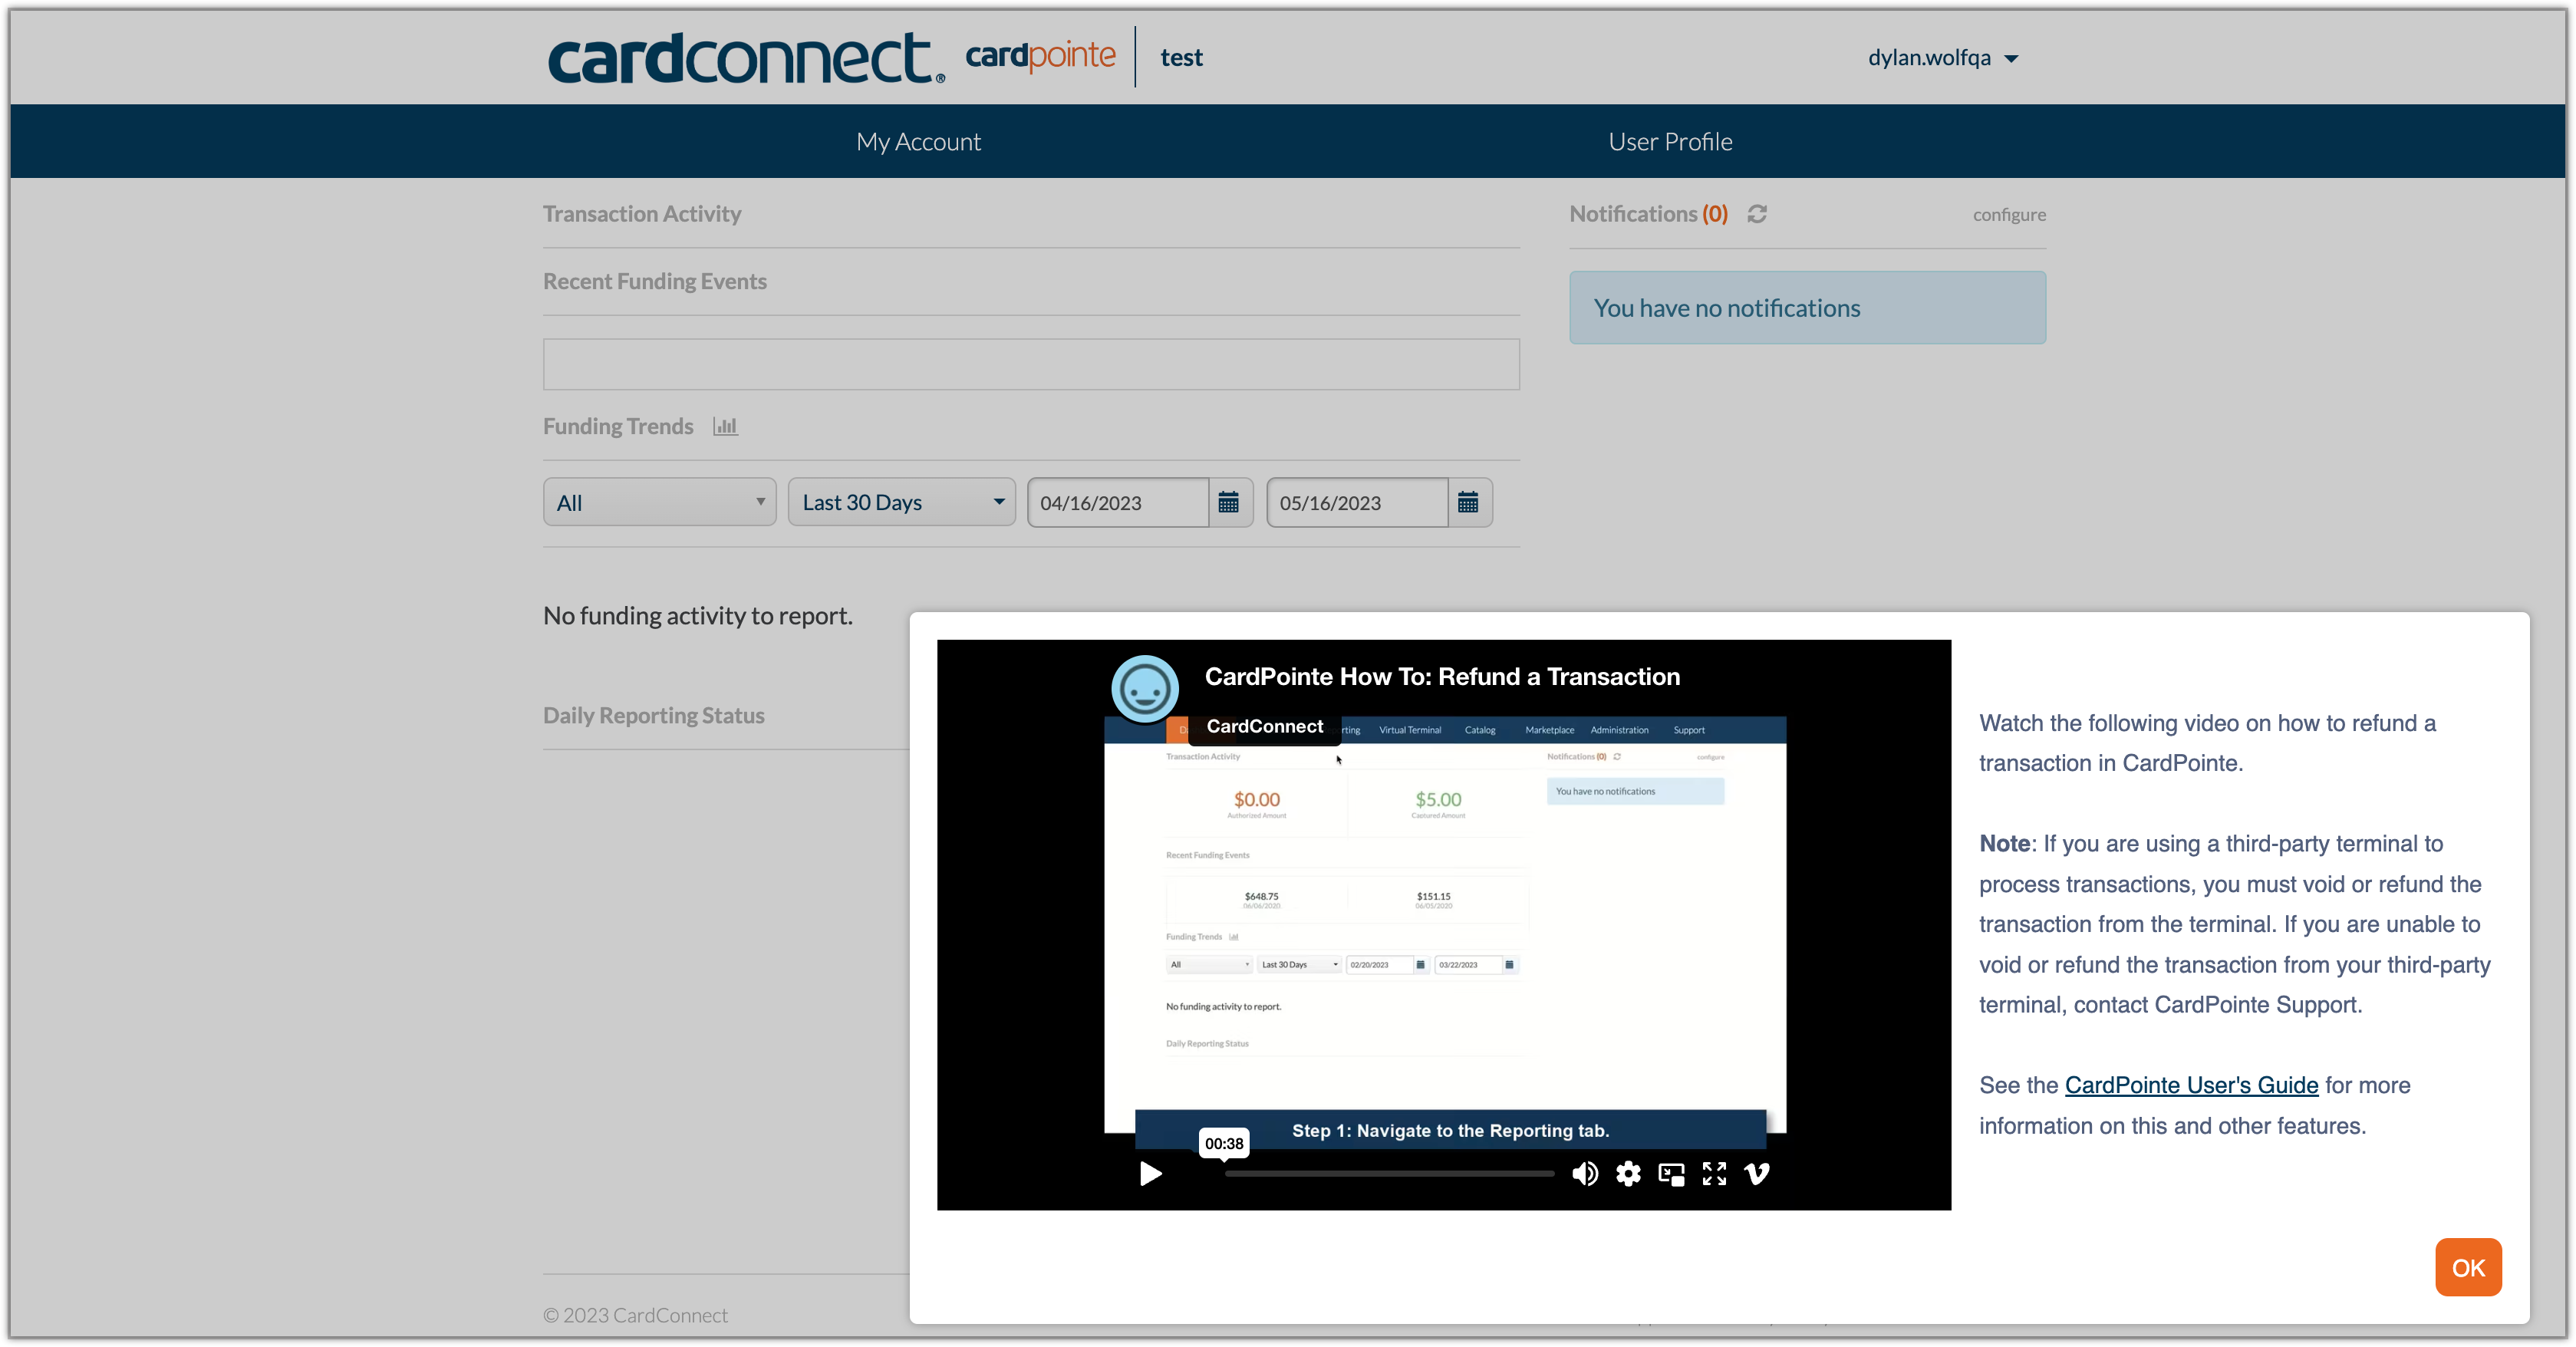
A series of tutorial videos were created to address common operational questions. A tour launcher can now be found on the CardPointe Web Application. Click on the question mark (?) located at the bottom right-hand corner of the application to open a small pop-up window listing the available tutorials. Select a tutorial to open another pop-up window with a video to guide you through the process. Each tutorial includes a short description and a link to the corresponding CardPointe Support site page for more information.
Depending on the size of your display, this window may be scrollable.
Currently, there are six tutorials listed in the launcher. These tutorials are:
- How to Run a Transaction
- How to Create Users
- How to Refund a Customer
- How to Locate Transaction Decline Code
- How to Access Statements
- How to Void Transactions
Export Functionality for My Account Pages
The data in CardPointe in the My Account tab for the Accounts, Equipment, and Orders is now available for export. An Export button has been added to these pages.
After clicking the Export button two options will appear Export as CSV and Export as Excel.
CardPointe 1.62 Release (2/6/23)
This release includes the following enhancements, as well as backend improvements and fixes:
- Dashboard Notifications Re-enabled
- Updated PCI Compliance Link
- ACH Return Code Description
Dashboard Notifications Re-enabled
Dashboard notifications have been restored for the following events:
- Declined Transactions
- Refunds
- Forced Credit
A bug that was preventing these notifications from displaying has been fixed.
You can enable/disable these notifications under the Administration tab. Review our documentation on CardPointe Web Application User settings for more information.
Updated PCI Compliance Link
For merchants enrolled in our PCI compliance program, the link used to access your compliance details is now https://pci.cardpointe.com.
ACH Return Code Description
The ACH Return Code description has been added to the Transaction Detail page to provide more information on returned ACH (electronic check) transactions.
CardPointe 1.61 Release (11/16/22)
This release includes the following enhancements, as well as backend improvements and fixes:
- Category Code for Declined Visa Orders
- ACH Reporting Improvements
- Funding Date Filter
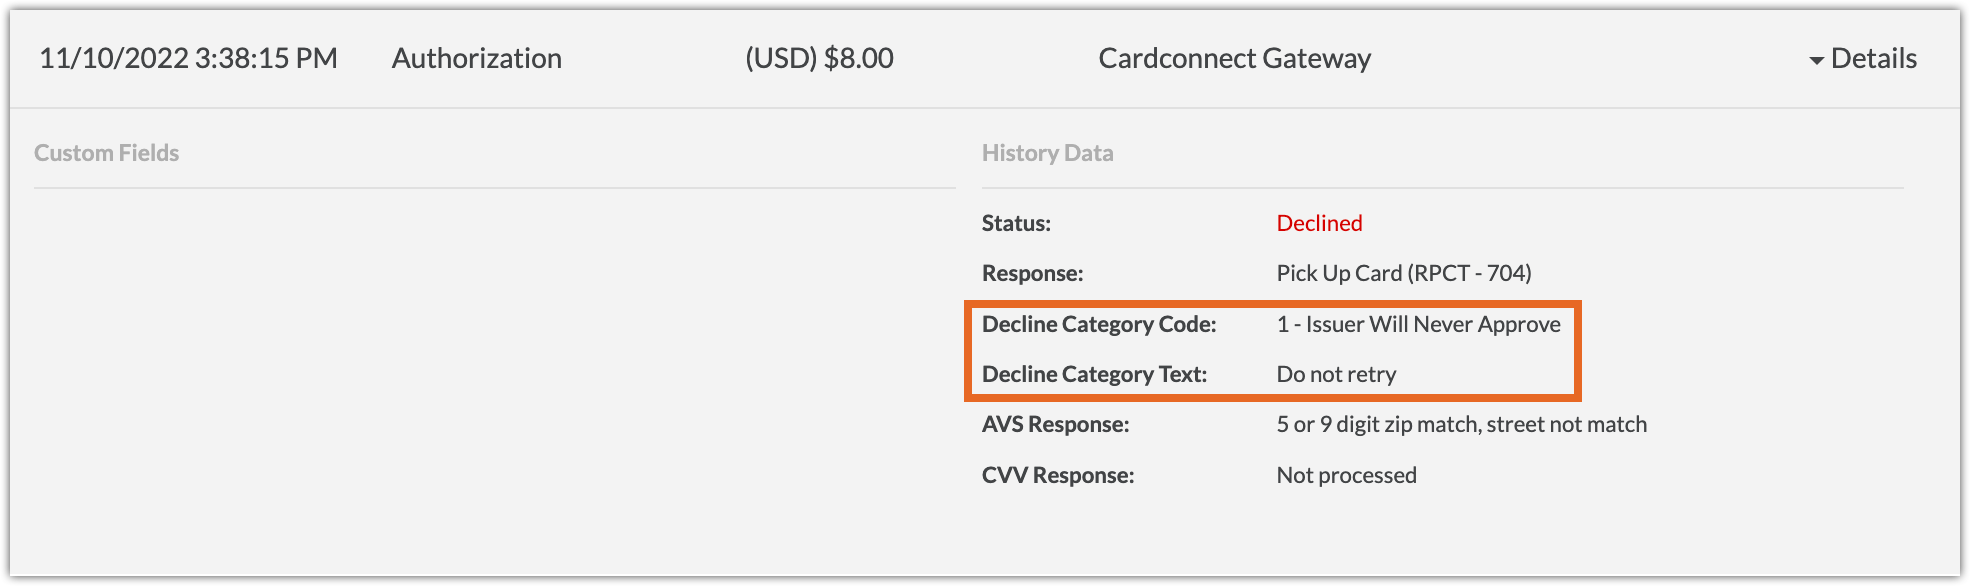
Visa Decline Category Codes
For declined Visa transactions, the Transaction Detail page now displays the following fields, to help merchants determine whether or not to reattempt the transaction with the given account information:
- Decline Category Code - Displays the decline category code and a reason for the decline.
- Decline Category Text - Displays instructions for the merchant.
For detailed information on understanding these responses and handling declined Visa transactions, see our Visa Declines Rules and Responses support article.
ACH Reporting Improvements
For merchants who accept ACH (electronic check) payments, CardPointe now displays additional reporting details for ACH rejects, transactions rejected or returned due to an issue with the account.
These enhancements apply to both Fiserv ACH (FKA BlueChex) and ProfitStars.
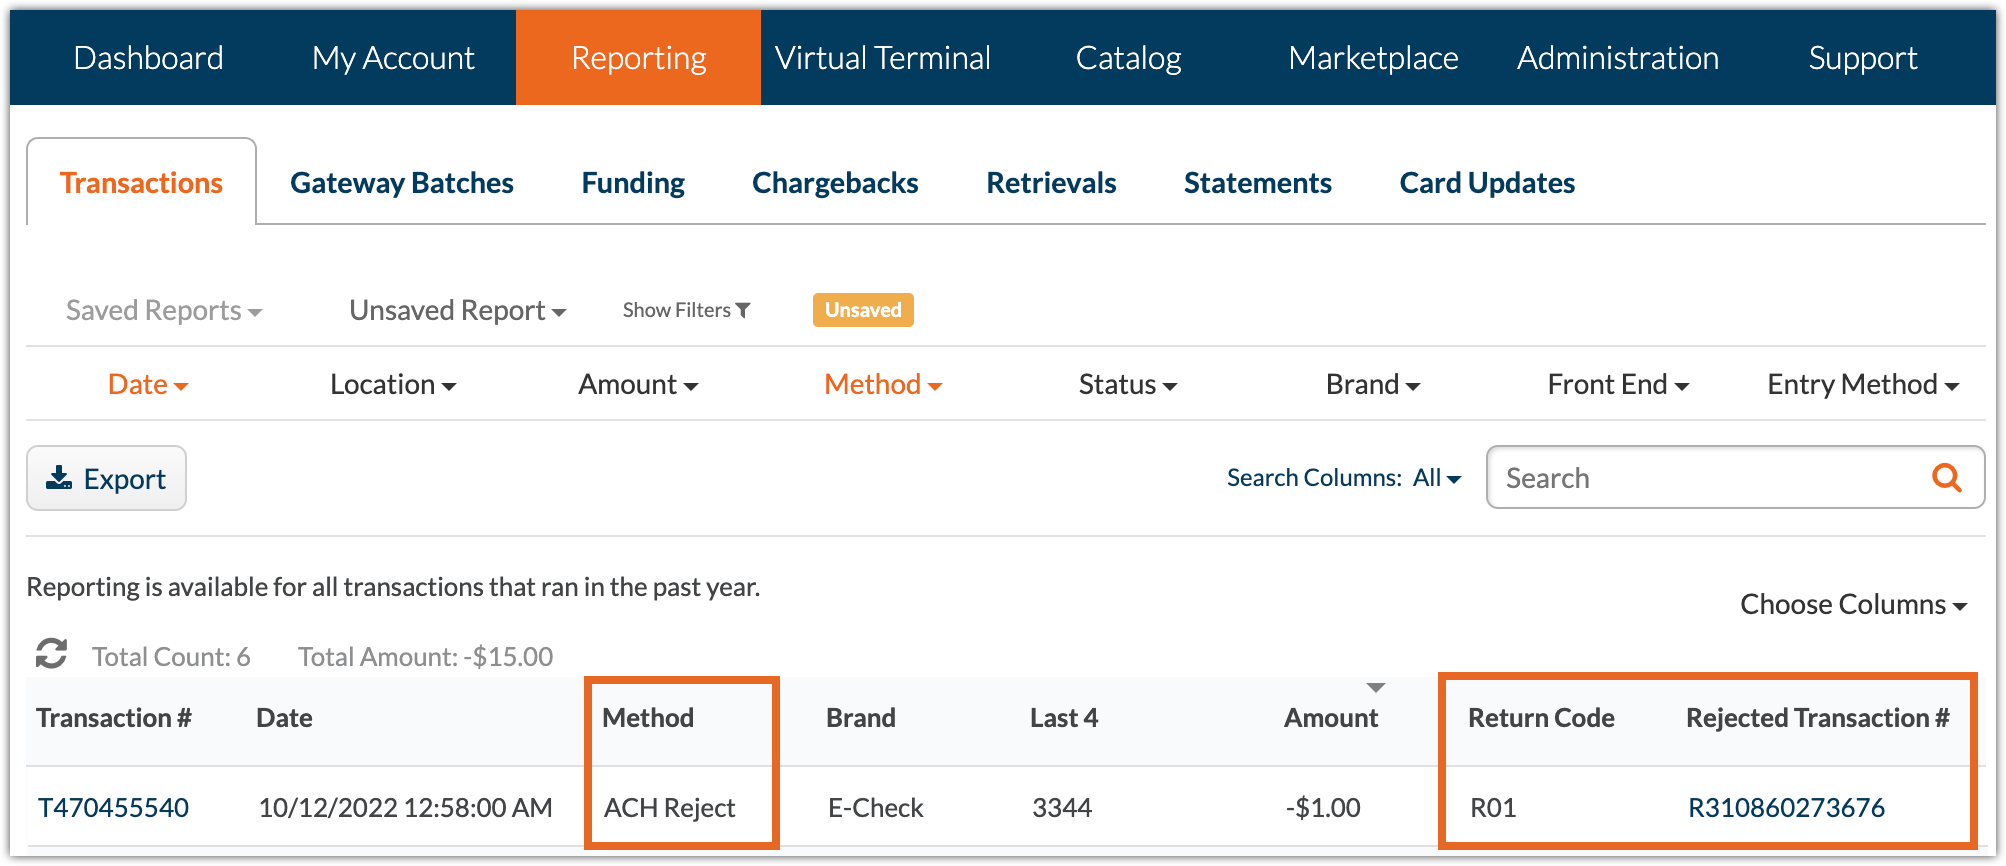
Transaction Reporting
The following changes have been made to the Reporting > Transactions page:
- The ACH Return value in the Method column and filter has been renamed ACH Reject.
- The following columns have been added:
Return Code - Displays an ACH return code and description for a returned or rejected ACH transaction.
Rejected Transaction # - Displays a reference to the linked transaction that was rejected.
These columns have also been added to the Gateway Batch Detail page, Funding Batch Detail Page, and Funded Batch Summary page.
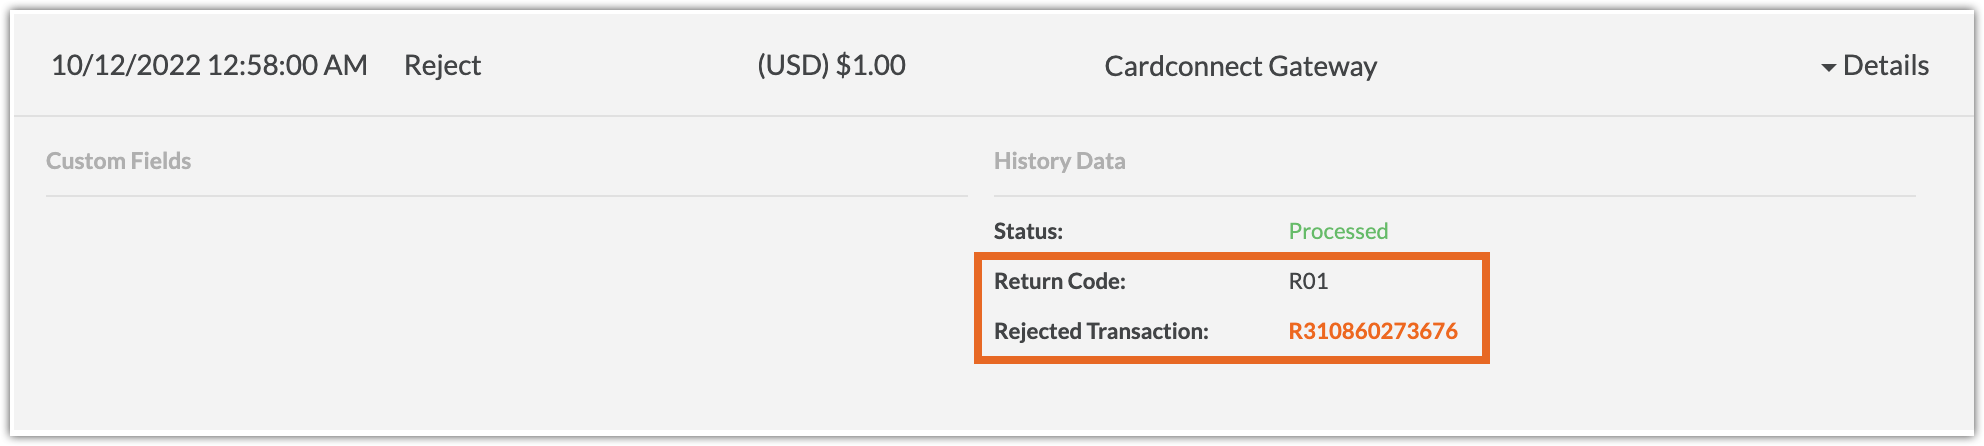
Transaction Detail Page
The following changes have been made to the Transaction Detail page:
For ACH transactions, an illustration of a paper check is now displayed instead of a credit card.
For ACH Rejects, the following fields have been added to the Transaction History:
Return Code - Displays an ACH return code and description for a returned or rejected ACH transaction.
Rejected Transaction # - Displays a reference to the linked transaction that was rejected.
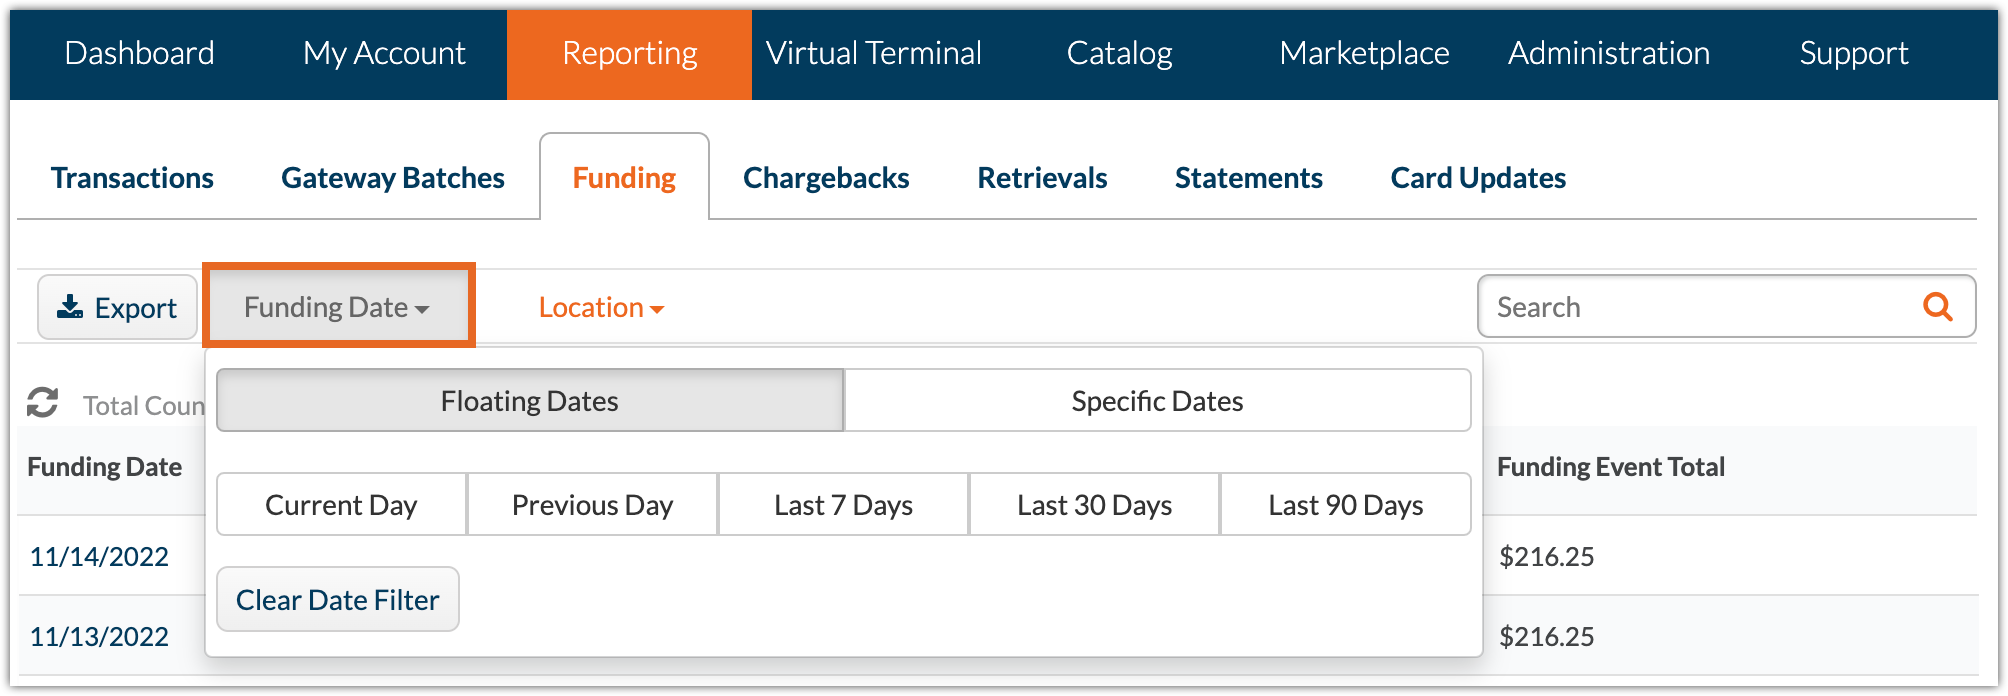
Funding Date Filter
The Reporting > Funding table now includes a Funding Date filter, to filter funding events by date.
CardPointe 1.60 Release (9/29/22)
This release includes the following updates:
- Bolt Is Now CardPointe Integrated Payments - UI and Reporting Changes
- Actions Button in Equipment Tab
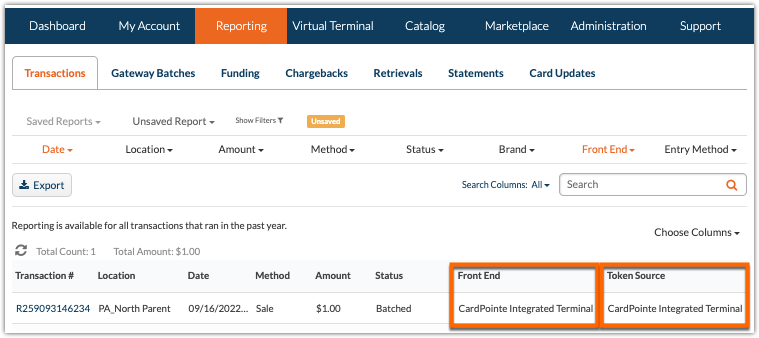
Bolt Is Now CardPointe Integrated Payments - UI and Reporting Changes
Bolt Terminal is now CardPointe Integrated Terminal. As a result, all references to the Bolt name and logo in the CardPointe UI have been updated.
These changes affect the Virtual Terminal UI for accepting payments with a connected terminal, the Reporting tab and exports, the Administration > Virtual Terminal settings, Marketplace tab, and My Profile page.
If you currently have any automated reporting logic using "Bolt" as a keyword in the Front End or Token Source columns, these changes may require updates to your automation to instead use the new "CardPointe Integrated Terminal" value in these columns.
Actions Button in Equipment Tab
On the My Account tab, the Equipment table's Enable, Disable, and Rename buttons have been combined under a single dropdown list labeled Actions.
CardPointe 1.59 Release (8/10/22)
This release includes the following updates:
- Terms and Conditions
- Statement Download Enhancements
- WooCommerce Removed from CardPointe Marketplace
- New Transaction Status Mappings
- Backend Fixes and Improvements
Terms and Conditions
This release introduces an updated version of the Terms and Conditions for using the CardPointe web application. This updated version includes minor grammatical changes. Users are required to review and accept the terms to continue using the application.
To review the Terms and Conditions or download a copy, click here.
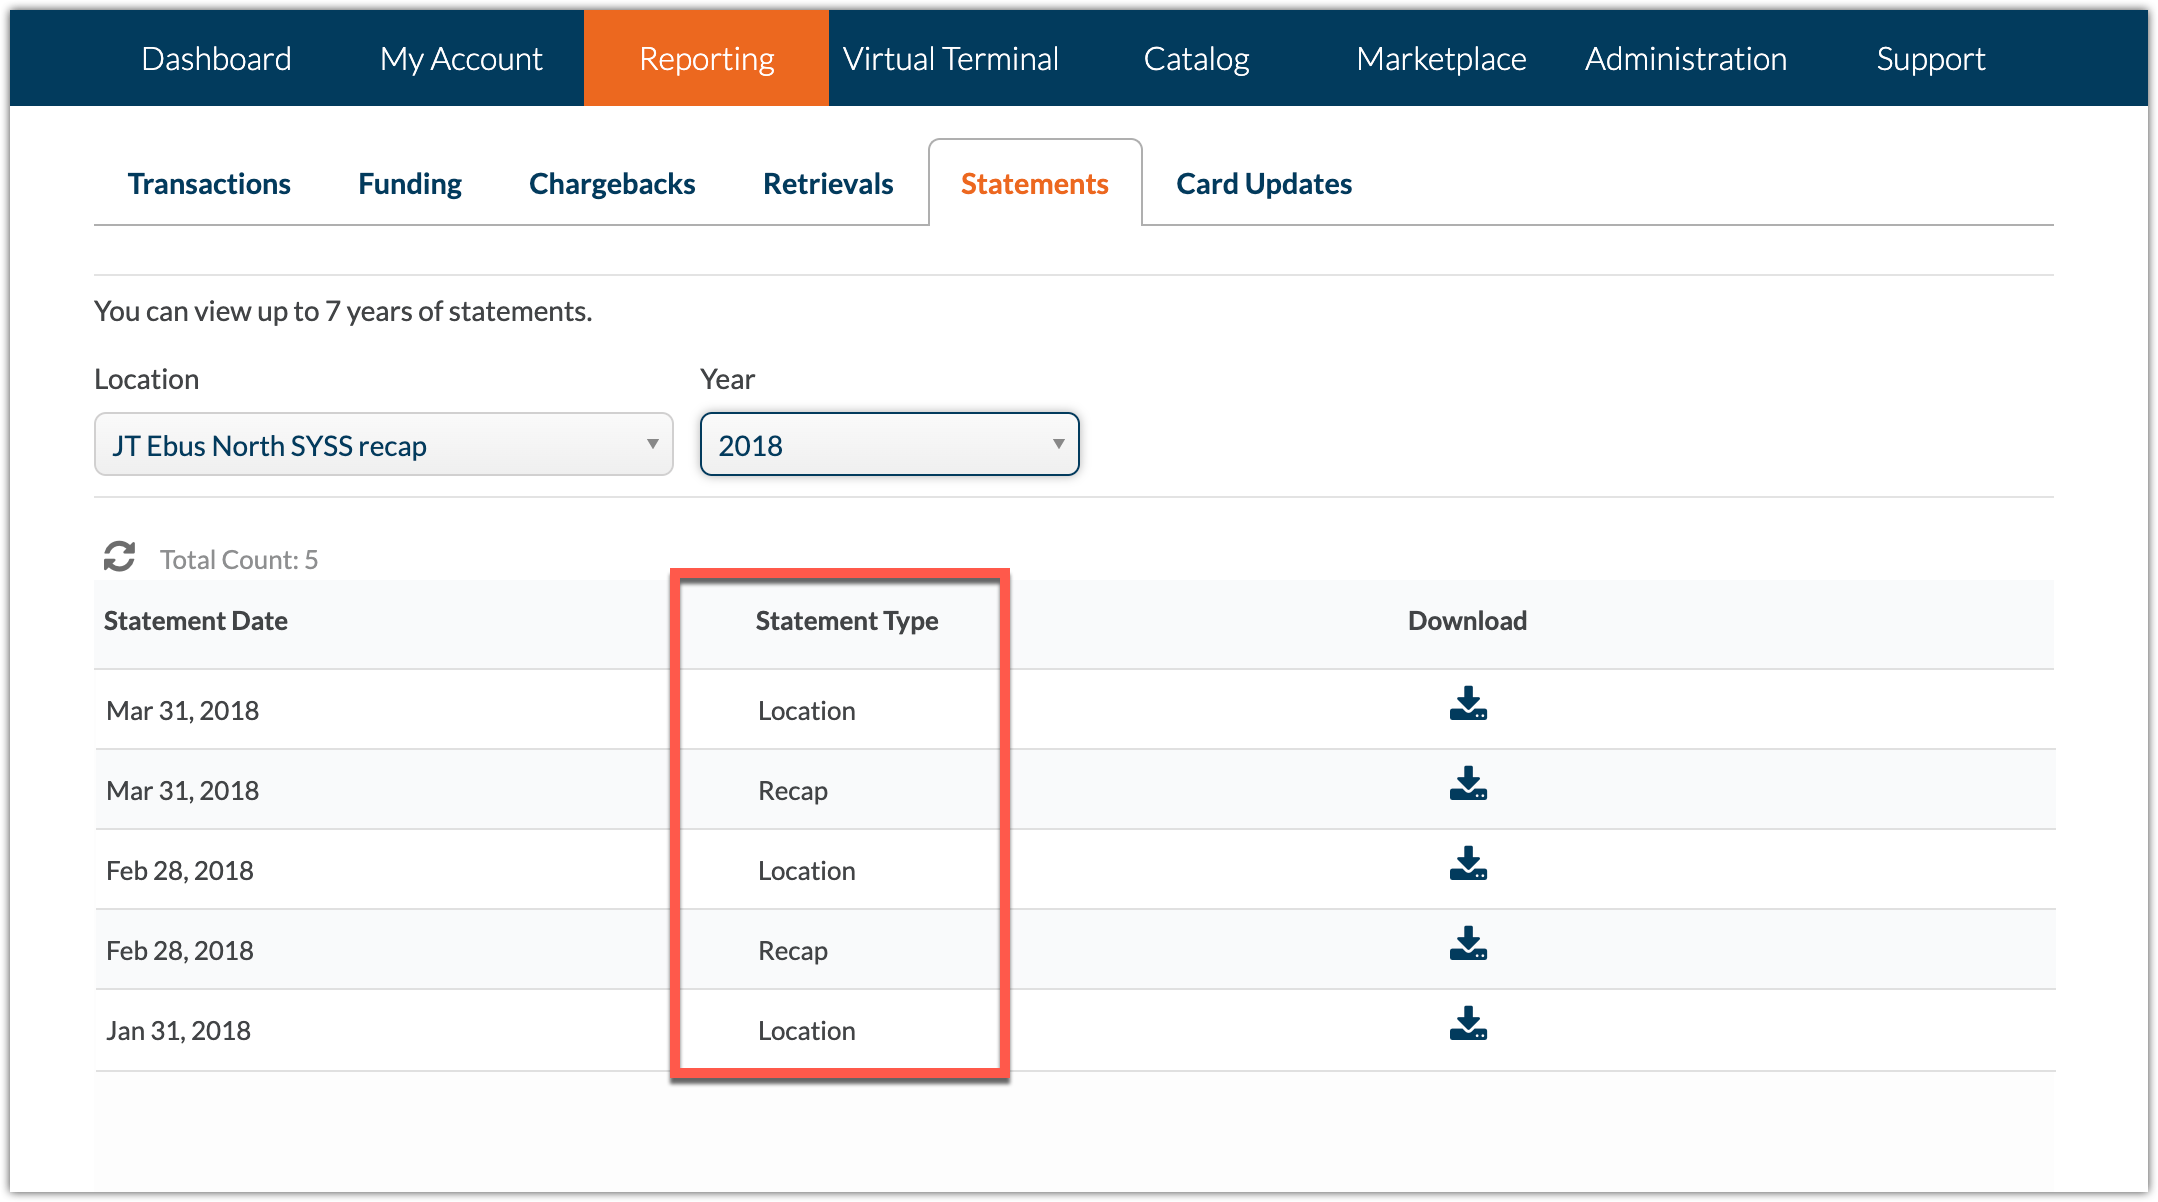
Statement Download Enhancements
Recap Statement Update
A Recap Statement is a monthly statement for North merchants that reports the total processing and fee amounts for multiple locations under a MID.
This release includes an update to the table in the Statements tab under the Reporting section to support the retrieval of Recap Statements for North merchants. For this, a new column has been added to the table which displays the Statement Type to allow merchant users to differentiate between each type of statement.
The Statement Type column has been added after the Statement Date column. The Statement Type column will display Location or Recap for North, South, and Omaha merchants.
For merchants not on the North, South, or Omaha platforms, the Statement Types will display as Statement, Invoice, or Insert accordingly.
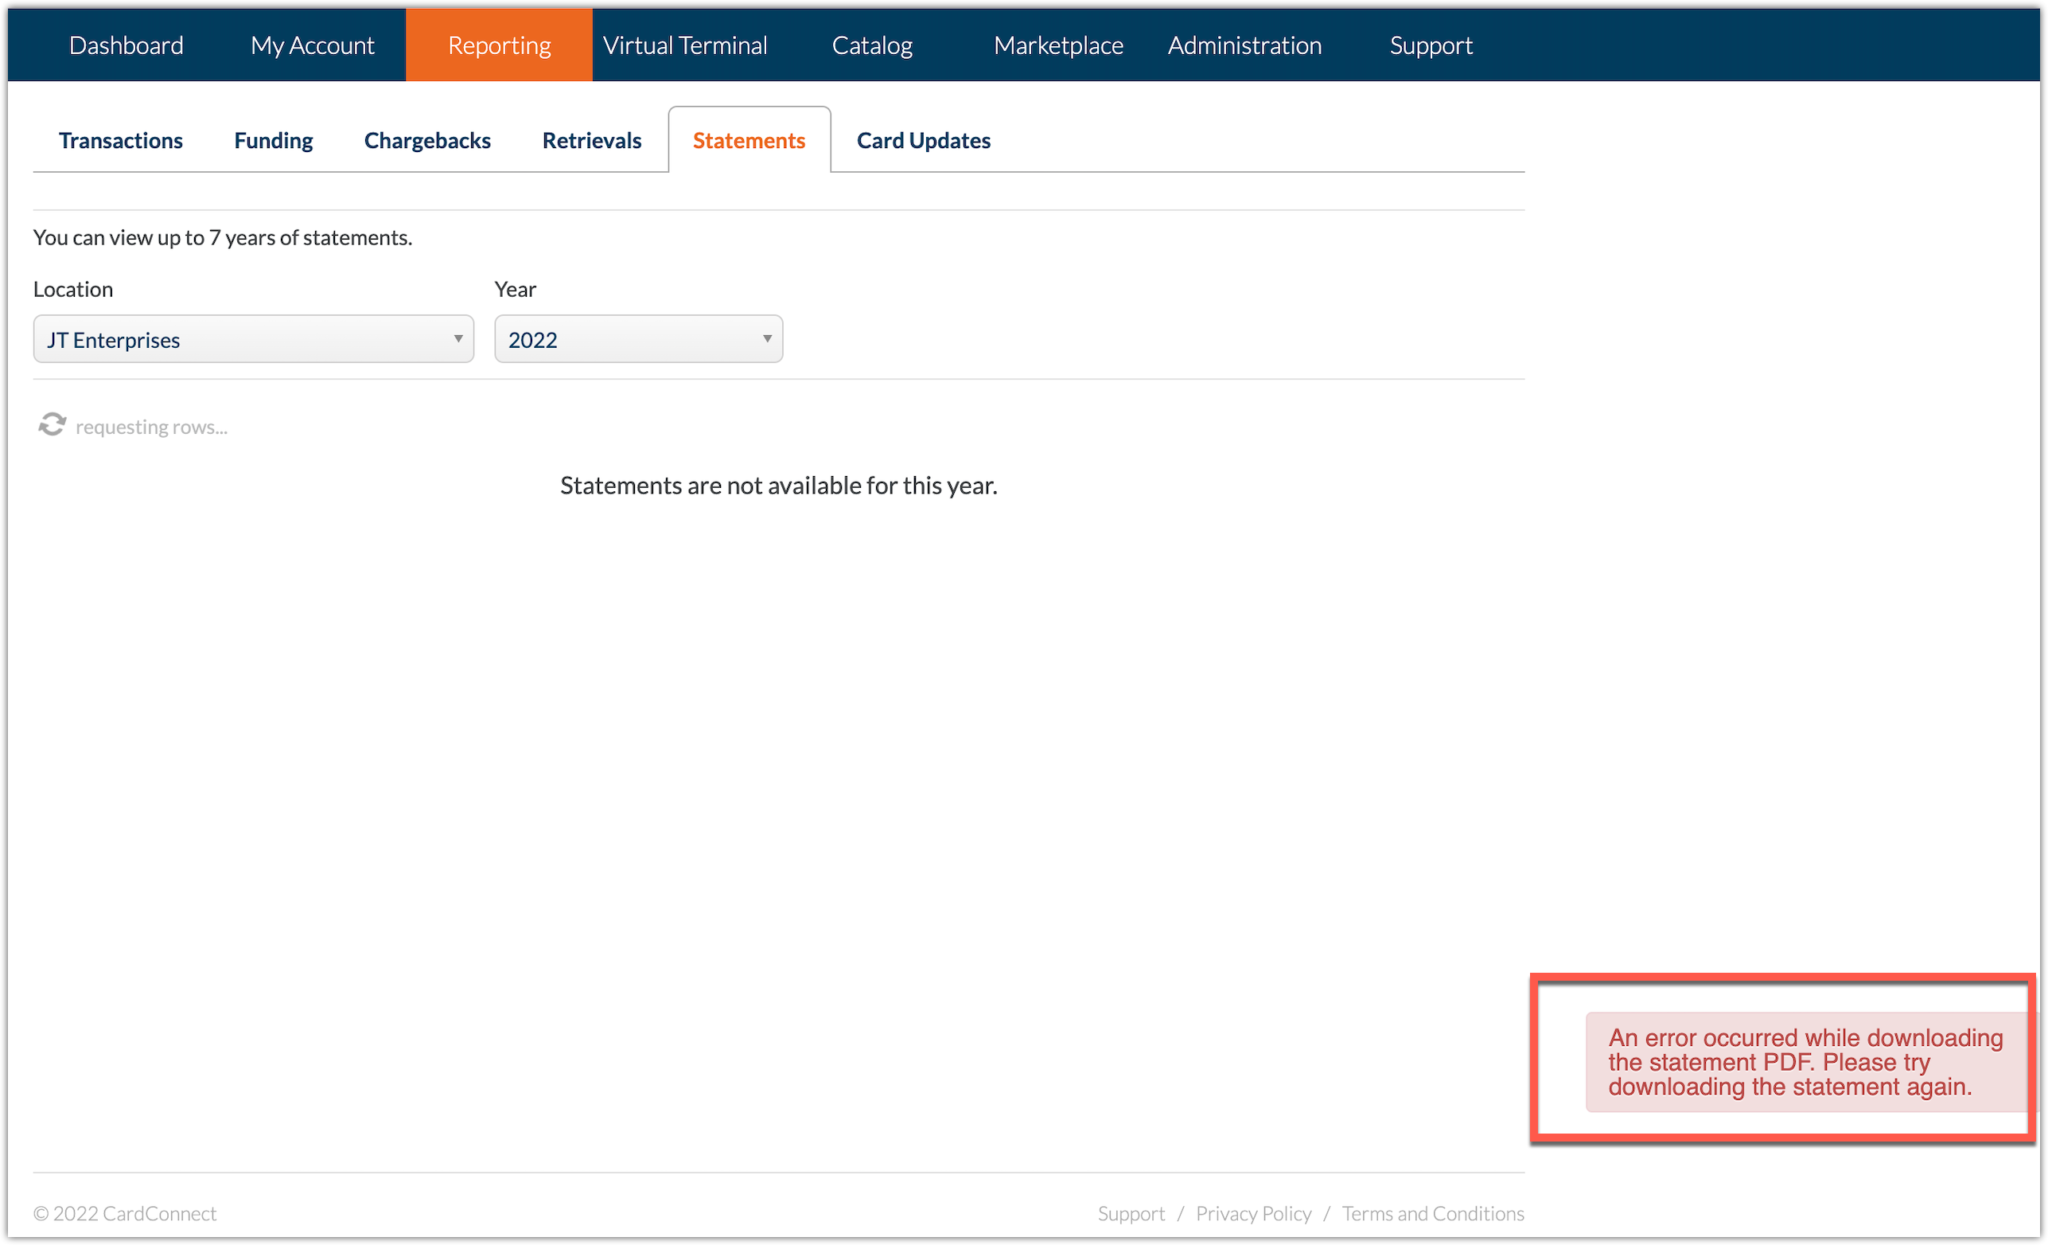
Improved Error Handling for Customer Statement Download Fails
When a customer statement download fails, you are now redirected to the Customer Statements page, and an updated error message is displayed. If you encounter this error, try again to download this statement.
WooCommerce Removed from CardPointe Marketplace
WooCommerce tile is no longer available from the CardPointe Marketplace tab. CardPointe no longer supports the use of WooCommerce for new users. Due to this change, the WooCommerce shopping cart tile no longer appears on the CardPointe web application.
New Transaction Status Mappings
The following transaction statuses have been added to CardPointe for certain declined transactions:
- Format Error
- Token Decrypt Failed
- Unknown
Backend Fixes and Improvements
This release includes backend fixes and improvements. No user-facing changes resulted from these modifications.
CardPointe 1.58 Release (3/9/22)
This release includes the following updates:
- Terms and Conditions
- New User Alert Notifications
Terms and Conditions
This release introduces Terms and Conditions for using the CardPointe web application. All users are required to review and accept the terms of use to continue using the application.
To review the Terms and Conditions or download a copy, see here.
New User Alert Notifications
Admin and Super Admin users can now enable email alerts to receive a notification when a new user is created in CardPointe.
When enabled, you will receive an email notification each time a new user is created for your account. The email includes the new user's details, so you can determine whether or not the user is valid and take any necessary actions.
To enable New User Alerts, do the following:
CardPointe 1.57 Release (1/19/22)
This release includes backend fixes and improvements. No user-facing changes are included in this release.