-
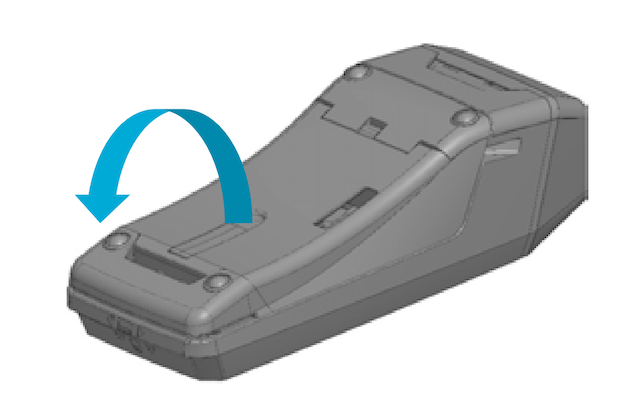
Flip the terminal over and remove the trap door.
-
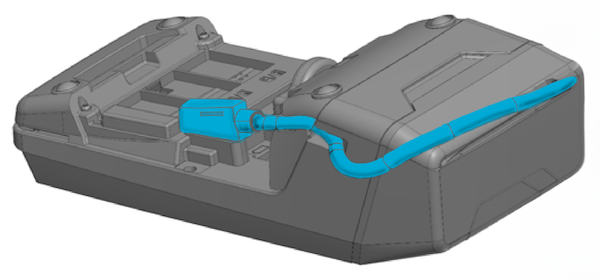
Connect the USB-C POS data cable and route the cable along the side of the device, as pictured
-
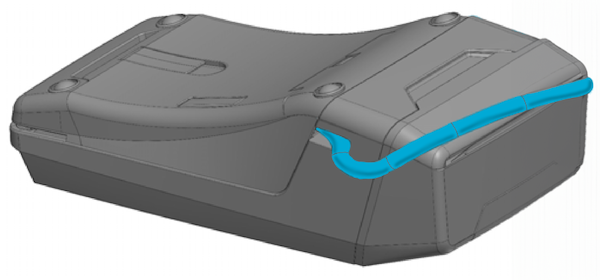
Replace the trap door.
-
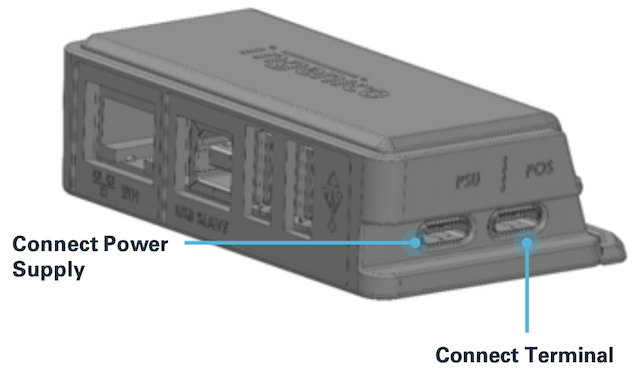
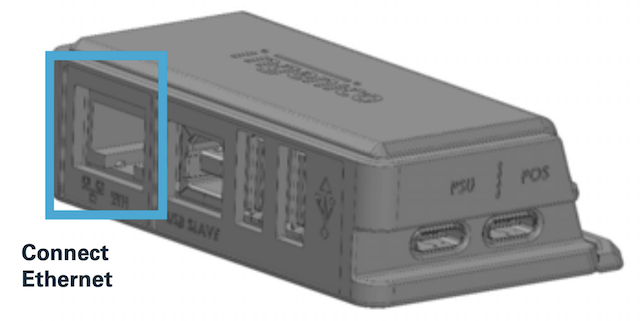
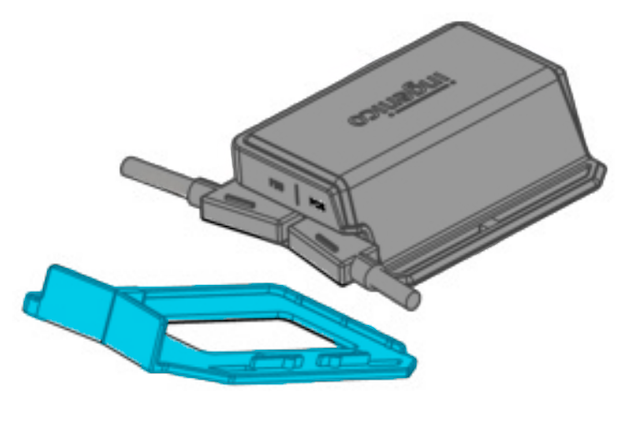
Connect the USB-C POS data cable to the Magic Box port labled POS.
Connect the USB-C Power adapater to the Magic Box port labeled PSU.
-
Connect the Ethernet cable to the Magic Box port labeled ETH.
-
Install the Magic Box base/USB-C connector clamp.
-
Connect the Ethernet cable to your network appliance and connect the power supply to a power outlet.
-
The terminal should power on and connect.

Overview
The CardPointe Retail Terminal is a stand-alone payment solution requiring no point-of-sale (POS) software or integration development. Setup requires only a power source and a wired ethernet connection, and all transactions are secured using PCI-certified point-to-point encryption (P2PE) and the patented tokenization of the CardPointe Gateway.
Benefits
The CardPointe Retail Terminal offers a wide range of functionality and benefits:
- The ability to accept all card-present payment methods, including swiped (MSR), dipped (EMV), tapped (NFC), and manually-entered payment cards.
- P2PE security and the patented tokenization technology of the CardPointe Gateway to protect against counterfeiting and skimming.
- CardPointe's web interface and mobile app for real-time reporting on transactions, batching, and funding.
- Tip adjust and server ID features with the Restaurant Application, perfect for restaurants, delis, spas and more.
- Interchange optimization automates lower rates for eligible Level 2 and 3 transactions.
- Automatic terminal updates to ensure your terminal always has the latest features and fixes.
- Can be paired with a customer-facing PIN pad for accepting PIN debit transactions.
CardPointe Reporting & Virtual Terminal
The CardPointe Web interface and CardPointe Mobile app communicate directly with the CardPointe Gateway, offering you access to transaction history and details, as well as the ability to create customer profiles, process transactions, and issue refunds through the Virtual Terminal when your CardPointe Retail Terminal is out of reach.
Real-Time Transaction Details
- View all transaction history and transaction details
- Filter transactions by date, location, amount, card number, and many other criteria
- Save and load filters to generate your own custom reports
- View the status of all batching and funding events
- Access to all of your monthly statements
Virtual Terminal
- Capture, void, and refund transactions from a desktop or mobile device
- Create customer profiles
- Create a billing plan for customers on a recurring billing cycle
Ordering a CardPointe Retail Terminal
To order a CardPointe Retail Terminal, reach out to your Agent.
You can also order the CardPointe Retail Terminal from the CardPointe web application on the Marketplace Tab, if this feature is enabled for your account.
Use of the CardPointe Retail Terminal requires a CardPointe merchant account.
What's New?
CardPoint Retail Terminal Application 4.0.2
Version 4.0.2.x of the CardPointe Retail Terminal application is now available.
This release includes the following updates:
Menu Changes
This release includes a change to the keys used to access the following menus:
- Tip Adjust/Search - This menu has changed from the 5 key to the 4 key.
- Close Batch - This menu has changed from the 6 key to the 5 key.
- Other - This menu has changed from the 7 key to the 6 key.
The step-by-step instructions in Using the Terminal have been updated to reflect these changes.
Improved Gateway Decline and Timeout Handling
This release includes enhancements for handling decline responses from the CardPointe Gateway, and timeout scenarios in which the terminal does not receive a response from the Gateway. In these cases, the terminal now displays a "Please Retry" message, and the original transaction attempt is voided.
Voice Authorizations No Longer Supported
The voice authorization feature (previously key 4 on the keypad) is no longer supported.
In the event that you are prompted to call the issuer, please ask the cardholder to use a different payment method.
Desk/2600 Terminal and Desk/1600 PIN Pad
The Desk/2600 CardPointe Retail Terminal and Desk/1600 PIN Pad are now available.
The Desk/2600 and Desk/1600 replace the Desk/3500, Desk/5000 terminals, and Desk/1500 PIN Pad which have reached end-of-life and are no longer available for new orders.
See Setting Up The Terminal for step-by-step instructions for setting up a new Desk/2600 terminal.
See Setting up the PIN Pad for step-by-step instructions for setting up a new Desk/1600 PIN pad.
Setting up the Terminal
The following topics provide information for getting started with the Desk/2600 CardPointe Retail Terminal.
What's in the Box?
- Ingenico Desk/2600 terminal
- Ingenico Magic Box connector hub
- USB-C power adapter
- USB-C POS data cable
- Ethernet cable
Connecting the Terminal
Perform the following steps to set up and connect your new terminal.
Confirming Connectivity
Your CardPointe Retail Terminal displays a network status icon at the top-left of the screen:
- The icon displays as white when disconnected from the network.
- The icon displays as green when connected to the network.
Checking Network Settings
To check the current network settings, follow the steps below:
-
Press .,#* on the keypad to access the Admin Menu.
-
Press 4 for Setup Menu.
-
Press 2 for Communications.
-
Press 3 for Ethernet.
-
Press 1 for Current Setup.
-
The current network settings are displayed on the screen.
Default Terminal Configuration
The CardPointe Retail Terminal supports a variety of optional features. The following table describes the configurable options and their default settings:
| Configuration Option | Default Setting | Description |
|---|---|---|
| Last 4 Verification (Swipe) | Off | When enabled, the terminal prompts you to enter the last 4 digits of the card number when processing a swipe (MSR) transaction. |
| Receipt (Customer Copy) Prompt | Enabled for all transactions | When enabled, the terminal prompts you to select whether or not to print a receipt copy for the customer. |
| PO Prompt | Off | When enabled, the terminal prompts you to enter a purchase order (P.O.) number. |
| Invoice Prompt | Off | When enabled, the terminal prompts you to enter an invoice number. |
| Auto Batch Close | Set for 9:50 PM Eastern Time | The time at which the terminal's daily batches will close for settlement. |
| Pass Terminal Prompt* | Off | Allows you to pass the terminal to the cardholder for input (for example, to confirm a sale amount and tap an NFC payment card or device). When enabled, you enter a sale amount, and the terminal prompts you to pass the terminal to the customer. The customer must then press the green enter button to accept the sale amount, and is then prompted to swipe/ insert, or tap the payment card. The customer is then prompted to pass the terminal back to you. |
| AVS Verification* | Off | Enables the Address Verification System (AVS) check. When enabled, the terminal prompts for the cardholder's zip code. |
| CVV Verification* | Off | Enables the Card Verification Value (CVV) check. When enabled, the terminal prompts for the CVV number found on the back of the card. |
*Settings are not configurable on the device. Contact Support to change these settings.
Benefits
The Desk/1600 PIN pad serves as a secure, encrypted extension of the CardPointe Retail Terminal, with the following benefits:
- Provides a customer-facing interface for performing and completing transactions
- Compatible with both credit and PIN debit transactions
- Supports contactless payments such as Apple Pay, Google Pay™, and contactless cards
What's in the Box?
- Ingenico Desk/1600 PIN pad device
- Ingenico PIN pad data cable (USB)
Your CardPointe Retail Terminal must be disconnected from the power before connecting the PIN Pad.
-
Disconnect your CardPointe Retail Terminal from the power source.
-
Connect the 90-degree end of the PIN Pad USB cable to the USB port labeled USB Host on the Magic Box.
-
Turn over the PIN Pad and slide the USB port lock aside to access the USB port.
-
Connect the USB cable to the PIN Pad and slide the USB port lock closed to secure the cable.
-
Reconnect power to the CardPointe Retail Terminal and allow the terminal to connect to the PIN pad.
-
The terminal and PIN pad will power cycle, and is ready to use when the CardPointe background is displayed.
For iCT220/250 CardPointe Retail Terminals, see the following quick reference guides: